Thursday, August 28, 2014

Creating Pretty Things With The Scraps Of Elegance August Kit~Raindrops On Roses


Today, I have a card and tag set to share with you that I created with the Scraps Of Elegance August Kit~Raindrops On Roses.


I centered the pieces around some of the Authentique Life cards that were included in the kit, and then added lots of paper layering, paper curling, and details that added both depth and texture.


The card was centered around the Quote "The Whisper of a Pretty girl can be heard over the Roar of a lion." and I added lace from a past kit, some flowers from the kit and Floral Add on, some hand dyed seam binding, one of the little pearl and rhinestone pieces from the Embellishment Add On, and two of my Tiny Treasures Love Story Butterflies that you can find in my Reneabouquets.com Shop.


Here you can see the depth that the layering and paper curling added to the corner of the card.


And this is the backside of the card. The pattern on the paper was just perfect for giving a finished look to it. 


The matching tag was centered around the "Life is about the pretty little things" quote. 


I did the paper curling at the top of the tag to add in depth, added another hand dyed seam binding bow topped with another pearl piece from the EAO.


I added in texture with the black lace and some tulle, the popped on some more of the flowers from the kit and add on. I then added a beautiful little Vintage Hand Mirror piece and some more Tiny Treasures Love Story Butterflies from Reneabouquets.com.


I distressed and layered on some matching paper on the backside for a finished designer look. 

With the Scraps Of Elegance Kits, you can put together some really wonderful matching pieces like this card and tag set. You get so many items that coordinate beautifully with the papers and make bringing a cohesive look to your projects a snap! Thanks for dropping by! Hugs ~Renea


Monday, August 25, 2014

Love Today~Scraps Of Darkness August Kit-Weathered And Worn


The Scraps Of Darkness August Kit~ Weathered And Worn, has arrived and WOW is it a beauty!
 I just couldn't wait to dive into it, and I went straight for the Shabby Country look.


I started by using modeling paste with a Doily stencil to randomly bring texture and depth to my first page. Next, I tore the 2nd layer into the shape I wanted, and layered it with some of the crochet lace trim from the kit peeking from under the left side. 


Another layer was created with some torn, misted corrugated board, and then I created a photo matte for my picture from off white burlap.


At the top of the corrugated board, I added one of the Chipboard Frames that I painted and then colored and cut out a "Today" sentiment piece to top it.


Behind the photo I fussy cut a card piece from the kit papers and then added a little metal clip from a past kit and tucked it behind the photo. 


I ran the large rope across the bottom of my layout, and then added one of the little canvas tags from the kit, that I used a rubon from a past kit to add a pattern to, and then topped it with a little Love Stick Charm from the Trinkets set in my Reneabouquets.com Shop. The Pink Lipstick Kisses Butterflies used were also from my Shop. 


And here, I added cheesecloth, a past kit flower and from the floral add on as well as some in the right hand, top corner to finish off my look.

Thank you so much for dropping in and checking out my layout! Hugs ~Renea


Friday, August 15, 2014

So Fairylicious Tag Set~


The Scraps Of Darkness July Kit~Believe has me believing in fairies and magic!! With all those yummy Bo Bunny Enchanted Garden papers and all the natural elements to this kit you too can make a little magic!!

Today, I have a set of Fairylicious Oversized Tags to show you that I created with the Believe Kit.


I started by overlaying the purple kit paper over the rock path paper, on both tags


I then used a Tim Holtz Speckles Stencil and some Tim Holtz Texture Paste that I carry in my Reneabouquet.com store on both tags, and then layered in a Doily from my stash on this one.
I fussy cut out the door, the mushroom patch, the fairy and the "Nature's Beauty" banner and glitter paint accented them and layered them in. Next I used the moss from the kit, some stash cheesecloth and a flower from the floral add on to add texture and dimenstion.


Here you can see where I did some paper curling to expose the "path" paper underneath.

The  Tiny Treasures Enchanted Garden Dragonflies were dreamed up, drawn and created by me just for the Embellishment Add On for this kit.


The second tag was a repeat of the first tag only with different fussy cut pieces and was made to be left facing, instead of right.

The Rhinestone Buttons and little Fairy Sitting On The Moon and Sitting On A Star are sold in a Reneabouquets Fairy Trinkets pack on my Shops.


The back side of the tags are finished out for a nice, designer look.

I hope you find the time to create a little magic for yourself this weekend!! Thanks for the visit!! Hugs ~Renea


Thursday, August 14, 2014

All That Glitters Altered Printer Tray~


When Melinda puts a Scraps Of Elegance Kit together, she tends to put in all kinds of wonderful odds and ends, and I love it, because when it comes to filling cubbies in a project, they are perfect!!

I used the August Kit~Raindrops On Roses to create the following Altered Printer Tray, and tucked in lots of those little items, along with some past kit items and some stash Trinkets to fill my cubbies to overflowing.


I started by texture painting the Print Tray and then filling the cubbies with paper pieces and the life cards from the kit.


Here you can see all the texture and hand stamping.
I created the textured look by first painting my tray with white acrylic paint, then sponging Tim Holtz Texture Paste from my Reneabouquets.com and Etsy Shops. The stamping was done with a script stamp from last month's SOE kit, and then I lightly dabbed around the surface with the Ingvild Bolme Ink that was in the kit.


I stamped the backside as well for a finished look.


I then got busy filling all those little spaces with lots of sweet Trinkets.
Items from the kit:
 Reneabouquets Shabby Pink Roses Butterflies
Pearl strands
Prima Flair Buttons
Items from the Embellishment Add On:
Faux Pearl Buttons
Marion Smith Junque Gems
Stickers
and the flowers were from the kit and Floral Add On.


I also used a Glamourous Rhinestone Button  and some Shabby Dream Pink Crochet Lace from my shops.


Here you can see the side view and all the dimension and textures of this piece.

Thank you for dropping by to spread a little glitter in my life!! Hugs ~Renea


Tuesday, August 12, 2014

August 2014 Challenge 16 - An Elegant & Textural Mood Board by Marilyn Rivera~


This month  the Scraps Of Elegance Design Team is the Guest Designers for the
Scrap Around The World 

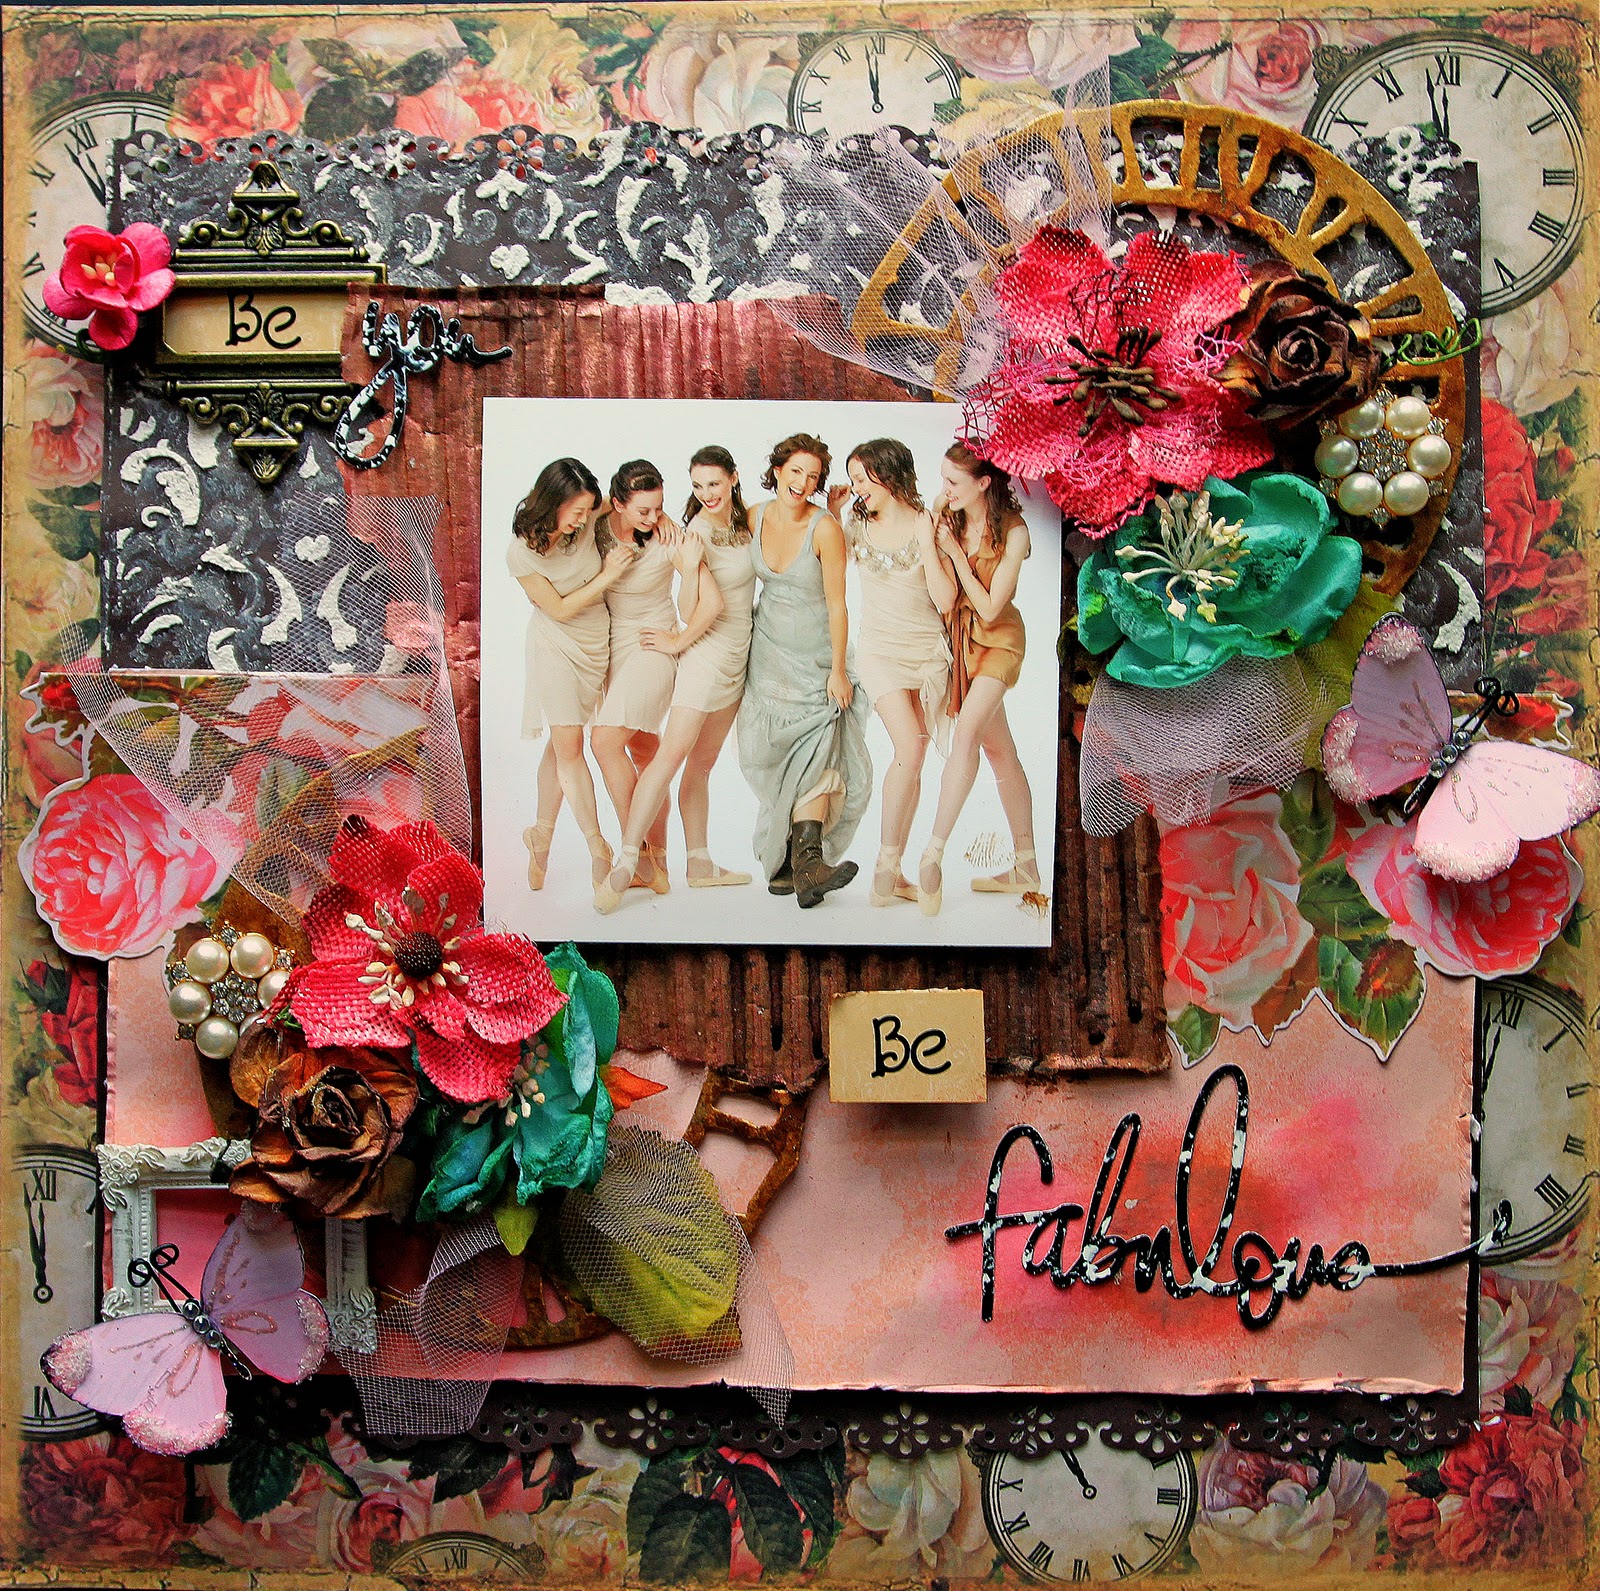
I was so inspired by the colors in this mood board, I think I picked up colors from every photo! I picked up roses and textures from the shoe photo, and pearls and bling from the wedding photo. I loved the tonal shade variations of the wall in the first photo and portrayed this on my clock pieces and corrugated board piece. The quote in the first photo reminded me that life is not about fashion, it is about being yourself and that is where my title work comes from.

You can check out the post that features all of the Scraps Of Elegance Designers here:


I used the Scraps Of Elegance July Kit~Chasing Rabbits to put my layout together with, and I teamed it with a Russian Ballet Photo that shows some of the dancers having some fun with all the girls in their pretty dresses and ballet shoes, with the one in the middle hiking up her dress to show off that she is wearing her boots!! This photo reminds me of just how FABulous being yourself can be~
I layered in lots of different kit papers that distressed, inked, punched and stenciled with texture paste. I then created another layer with one of the stickers from the kit, and then took Corrugated board and misted it in layers to mount my photo onto.


I then cut out a die cut weathered clock piece from chipboard and misted it then inked it to get a gorgeous aged color variation. I then used  flowers from the Floral Add On and my stash, along with some tulle pieces, and a Timeless Gold Rhinestone & Pearl Button that can be found along with the Oh So Pinkalicious Glitter Glass Butterflies on this layout in both my Reneabouquets.com and Reneabouquets Etsy Shops.


I created another flower layer at the opposite cornter at the bottom.


I did some misting, then stipple painted some of the word stickers from the kit,


and created my title "Be You Be Fabulous"

Mood boards can be so much fun to get your inspiration flowing, and I hope that you can join Scrap Around The World and the Scraps Of Elegance Design Team for this gorgeous one!!
Hugs~Renea

Wednesday, August 6, 2014

Using The Scraps Of Elegance Mood Board For Inspiration~ Walk Through With Layout


The Scraps Of Elegance August Kit~Raindrops On Roses has arrived and it is another stunner! With all those pink tones and roses, it will have you going Girly Girl, Girly Grunge, Girly Vintage, Girly Shabby and just plain Girly!!!


Melinda has decided that instead of a monthly sketch challenge, we are going to do a mood board challenge. I am very excited about it, and she created this gorgeous mood board, that you can find on our community Facebook page here: https://www.facebook.com/groups/scrapsofdarkness 
I have created a layout based on it. I know not everyone has used a mood board before, so I am going to take the time to walk you through how I used the mood board to create my layout. The thing about mood boards is that they can inspire you in so many different ways, and I want to make sure that anyone new to the process doesn't feel intimidated and has fun doing it!!


I loved the book page with the writing , so I took that inspiration and pulled my background paper which reminded me of the book page: 


From there I did some stenciling, and then inked it with the Pink Ink that was was in the kit. and then layered on my paper layers and photo.


From this photo, I pulled a few things~The black and white scheme with bold pops of color, became my over all feel to my layout, and I of course had to add some butterflies from my Reneabouquets Etsy Shop to it. I chose the bold Polka Dots and Bling Butterflies to pull from the polka dots on the papers.


You can see the black and white photo inspiration and the bold colors here.
The small flowers are from the kit, the roses are from the Floral Add On, and the butterfly transparency I used under my polka dot butterfly is from the Embellishment Add On.


I loved this photo with all the yummy textures, script print, and pinks and so I pulled texture into my layout, lots of pink tones and items that had writing on them.


I added texture with cheesecloth, yarn trim and that embroidered tulle material in the kit-YUMMO! I used flowers from the kit and floral add on to pull in different pink tones, as well as some more of the transparencies from the E.A.O. and I used the ticket pieces from that add on to pull in some more print words. I topped it all off with a Timeless Elegance Rhinestone Button from my shops to add some bling. 


I love all the little resin frames out there so I pulled this photo of frames as part of my layout inpiration, and 


used one to house my quote from the sticker sheet in the Embellishment Add on. I then topped it with a butterfly, a flower from the kit and another Transparency piece from the Embellishment Add On.
To finish off the layout I added some stash, torn pieces of tissue tape with some script writing on it randomly on my page, and then did some tear downs and tucked in some of the polka dot paper and topped them with some of the little rose stickers from the E.A.O. 


And here you can see all the dimension, texture and depth that I used to create this layout.

Thank you so much for dropping by, and I hope that you found my explanation of how I used the mood board helpful for your venture into using them. They are so much fun, inspirational and let's face it, just plain visually gorgeous to look at!! Hugs ~Renea

Friday, August 1, 2014

Making Magic With The Scraps Of Darkness July Kit~Believe


Our July kit is here!  Let us take you to a magical land with our "Believe" kit...  Don't forget to check out our July kit 
add ons - they all coordinate beautifully with our Main Kit!

This month's Scraps Of Darkness Kit~Believe, will have you believing in magic as soon as you open it!! The colors are so perfectly Yummy and the embellishments and add ons ore so naturally beautiful.

The following is a layout that I created using the kit and this month's floral add on. It features a photo that my son, Draven took at my God-Daughter Michelle's wedding and with the natural, out door theme to the wedding, this kit was perfect for capturing that magical moment.


I started with 2 different layers of the Bo Bunny Paper fromt he kit.

I cut the top layer and did some lacing with some hand dyed seam binding and eyelets. I then did some stenciling with a Tim Holtz Layering Stencil~Speckles and some Ranger Texture Paste from my Reneabouquets.com, and Reneabouquets Etsy Shop. I framed the photo with a stash resin frame, and then accented the frame and some random spots on the layout with some of the stickers from the kit that I cut apart and then puff painted.


Here I created a floral layer using some cheesecloth, past kit flowers and birdcage and the Blue Fern Layering Stems from the kit that I heat embossed. I tucked in a little bird that was from the sticker sheet in the kit.


Behind the photo I stamped using a Tim Holtz Distressed Damask Stamp from my Reneabouquets Shops. To get the 2 toned look, I first stamped with ink, then sprinkled embossing powder randomly and applied heat to set it.
I created the Enchanted Garden Dragonflies in the Tiny Treasure size just for this month's Embellishment Add On. The set on this layout are the regular sized ones, and you can find both sets in my Reneabouquets Shops.


Here you can see a close up of the embossing on the leaves, the stenciling with texture paste and puff paint work. 

I hope you have a magical weekend and that you find the time to create something beautiful or spend time with the ones you love!! Hugs~Renea