Sunday, September 29, 2013

Scraps Of Darkness~September Kit~The Black Album


If you haven't seen the Scraps Of Darkness September Kit~The Black Album yet, you should really check it out!! It is full of those so very hot, My Mind's Eye Chalk Studio papers and so many gorgeous embellishments to go along with them!

The Design Team kicked off reveal week with a layout, and now they are having their official reveal day today. Here are a couple of more layouts that I put together using this unique and yummy kit:


This first layout features a photo of my God Child~Michelle and at the time her fiancee, who is now her husband Richard (AKA Tooter). My son, Draven did their engagement photos and I loved how well this one with the chalkboard hearts went with this month's kit and add ons. 


I loved the stencil in the color add on and used it, just filling in the hearts randomly with Shimmerz Texurz. I did lots of puff paint stamping and outlining, seed beads and of course some grunged up corrugated board. The Ice Glitter Glass Butterflies are from my Reneabouquets Etsy Shop.


I set eyelets in the 2 pieces of corrugated board and laced them with tie offs made from the ribbon in the kit, added one of the Webster's Pages embellishments from the embellishment add on and added on flowers from the Flora & Fauna and a few from my SOE stash.

And here are some close ups of all the texture and mediums:


And here is a side angle of all the dimension:


Next I have a Vintage look layout that I did pulling the blues and blacks from the papers.


I fussy cut out the top paper and layered it onto a patterned paper that gave this layout a n edgy look. I did some crackle painting and inking on one side to give an aged, distressed look to it.


I spritzed the black Doillies from the kit with some of the mist from the Color Add On, and layered on some of the trim, a frame from the Teresa Collins Memorabilia sheet, a fussy cut frame from some of the paper, and one of the flair buttons all from the kit. The flowers and black flourishes  were from my past kit stash, and the Keep Calm Glitter Glass Butterflies are from my Etsy Shop.

Here is a close up of some of the details:


And here is a close up of the crackle painting and ink work:


A shot to show the dimension:

I hope that you have enjoyed my work with the Black Album Kit, and I hope you enjoy what is left of the weekend! Hugs to you ~Renea

Saturday, September 28, 2013

Delight Keepsake Book Box~

Hello everybody! Today  is my Tresors De Luxe Reveal, and I have a Vintage look altered book box that I would love to share with you. I created it using the following Tresors De Luxe Etsy Items:

White Acrylic Flower Spra-PF-028

Pink Fabric Flower Spray PF-023

I teamed the Tresors items together with my Scraps Of Elegance September Kit~Simply Shabby Chic to create this book box that you can use to store,  photos, momentos, jewelry or small keepsake items in. 


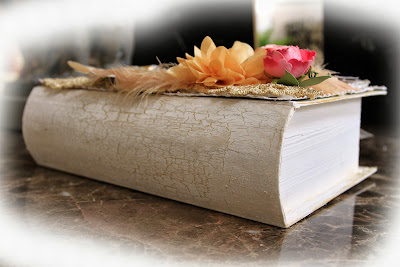
I started with paper mache book box that I coated with gesso, and then layered up the front with distressed paper layers, a Doily, and a sweet Vintage image that was a free download from  Janet K's  blogspot.


I layered up the back of the box as well.


Here you can see where I layered in the Tresors lace, dusty pink rose, white acrylic flower spray, and the pink flower spray along with embellishments and flowers from this month's SOE kit and add ons.


For the "spine" of the book I script stamped the inked layers and then added on a beautiful Tresors lace piece.


Here you can see where I used modeling paste to simulate "book pages".


And the inside is finished out in painted and inked layers and a distressed paper bottom.

I hope that I have inspired you to take some time for yourself to create, and if you are looking for some perfect touches for your projects, Tresors De Luxe makes it easy to add not only a little elegance to your projects, but loads of texture and dimension. Hugs, ~Renea


Friday, September 27, 2013

Scrapmatts~Something New And A Little Christmas Too!

When I saw the Design Team Criteria of "New", I knew that I wanted to create something with one of the gorgeous, new chippies that Scrapmatts revealed  this Summer~the Layered Fob Watch. It is such an amazing piece and has a yummy Vintage look to it, so I decided to create a Vintage look altered box using it. I used my Scraps Of Elegance September Kit~Simply Shabby Chic and some of the luscious  Gold Venice Lace Trim LA-145 from the Tresors De Luxe Etsy Shop to create the look that I was going for. 


I layered in lots of distressed Prima Delight Papers and fussy cut out some of the roses with a little clock and banner, added glitter paints to them and tucked them into the layers. I then fussy cut out a little fairy and a little Vintage image from the papers, glittered them up and added them on. I layered on the lace and then.....


I took the Scrapmatts CB5111 Layered Fob Watch 02 , and painted the back layer with Jacquard gold paint, then added a crackle medium (let that dry), then painted over the whole piece with white acrylic paint and allowed it to air dry to bring out the gorgeous crackle finish. I then painted the number face, the decorative top piece and the hands with the gold paint and then sponge painted them randomly for a time worn look.  I added a little fussy cut clock and some Prima pearls to top it off.

I then created my flower spray, and added in a fussy cut feather piece from the papers, some real feathers, and some hand stamped and fussy cut leaves. 

The Champagne Dreams Butterflies  are from my Reneabouquets Etsy Shop.


Here is a side look at the watch and all the dimension around it. 


I crackle finished the back and "binding" area with the same technique I used on the watch.


I created the look of "pages" by using a gel medium technique and the box ties closed with a sheer ruffle bow.


Here is a shot of the "binding" side.


And the inside is finished out in a painted and sponged finish.


Next, I have an oversized Victorian look Christmas Tag. I love the look of all things time worn and captured that with lots of distressing, technique and textures. 


There are lots of layers of Tim Holtz Papers that are distressed and inked. 
The image is one that I printed onto fabric transfer paper, then ironed on to some Canvas that I then cut out and frayed. 
And I added on lots of Crochet lace for even more texture.


At the top of the tag I created a hand dyed seam binding bow, and a hang tag from crochet lace, and then added on a Scrapmatts CB6081 Christmas Stars 02 that I heat embossed with distress powder and then accented with a pearl.


I then took two Scrapmatts CB1126 Australian Federation Corners 01
distress, heat embossed them and then added some of my very own, hand tinted German Glitter Glass.


I created a flower  piece and then took two of the Scrapmatts CB1097 Floral Spray 01
painted them green, added gold pearls randomly to the berry spots and then gold penned the others, and tucked them into my flowers.


I also painted one of the Scrapmatts CB1104 Holly 01 
and tucked it under my large rose for foliage.


And here is the finished backside of my tag.

Thank you so much for joining me for my monthly Scrapmatts Australian Chipboard reveal! I just love working with all the gorgeous chipboard pieces and I hope that I have inspired you to create with yours! Hugs~Renea


Thursday, September 26, 2013

Witch Tea Cup Fairy~

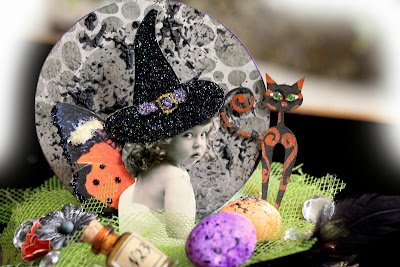
I have to admit, I have been dying to do a Halloween piece, and I just couldn't resist creating one of my Fairy Tea Cups with a Halloween Theme. I used lots of past Scraps Of Darkness Kit pieces, along with some Scrapmatts pieces and one of my Digitally Altered Vintage images that I tuned into a little witch fairy.


I use actual little birds nest that I find along my hikes in the Winter, after the birds have long gone. I then dry and seal them to use them in my art. The one I used for this one was a little mud nest so I covered most of it up with trim, but IRL you can see the nest part peeking out. 


I created the moon out of some Bo Bunny Zoology paper from a past SOD kit, and then sponge painted it with puff paint and turned on the heat to pump up the texture.


My Little Witch Fairy has a glitter painted hat and a set of my Little Pumpkin Butterfly wings. The little eggs are hand crafted from paper clay and painted. The flowers, sequins, tulle, feathers, wooden clock and trim are from past SOD Kits. The cat is a Scrapmatts CB6035 Cats 02 
that I hand painted and added crystal eyes to.


There is a cheesecloth "spider web" with a hand painted Scrapmatts CB1135 Spiders 01
to as well as to the handle of the cup.


I took a little tea bag left of from one of my morning cuppas and 2 tone inked it, stamped it with a moon stamp and then added trim, a feather and a flower, and a little G45 Chipboard tag with a crystal, all from past SOD kits. 

I love doing the little Fairy Tea Cups and this one in the Halloween theme has left me bewitched!! Thanks for stopping by~Hugs~Renea

Tuesday, September 24, 2013

Make It In Minutes~Vintage Pocket Journal


I can tell we are getting closer and closer to the Holiday season where Halloween, 
Thanksgiving and Christmas all come flying at me at the speed of light. Time is flying by and
 I feel like there are just not enough hours in the day to get everything done that I want to 
do. So, knowing how busy everybody is at this time of the year with the kids going back to 
school, all the fall yard work calling our names, and the Holiday season just around the 
corner, I have a sweet little pocket journal that I created with the Scraps Of Elegance 
September Kit~Simply Shabby Chic and the Embellishment Add On. I have all the steps
 mapped out in the Scraps Of Darkness/ Scraps of Elegance Forum in the Make It In Minutes thread here, http://scrapsofdarkness.com/Forum/index.php?topic=3543.0,  so that you can 
literally put this little beauty together in about 20 minutes. 


Hope you find the time to create one of these little pocket journals for yourself, and if you do, feel free to show it off in the gallery and in the Make It In Minutes Forum Thread :)

Hugs, ~Renea

Friday, September 20, 2013

Scraps Of Darkness September Kit~The Black Album

Scraps Of Darkness has unveiled the September Kit~The Black Album, and it is just packed full of some of the latest products that will have you digging in and layering up to create some really FABulous projects.


This is the September sketch created by Charlotte (Suepup) just for this kit:


And here is my take on the sketch. It features a backside perspective photo of our family friend, Madeline with her guitar slung across her back, so perfect for the "Black Album" theme. 


I used three different layers of the kit papers that I punched,accented with Puff Paints and stenciled with gel medium. 


I used a white Doilie to break up the black background, and stamped it with a script stamp and then puff embossed it. 


I used the silk bias ribbon from the Embellishment Add On to form a banner, and added the buttons from the kit, flowers from the Flora & Fauna Add On, and some cheesecloth for softness. I added more cheesecloth and flowers to the top banner on the paper.


Here you can see the dimension that all the paper layers, technique and embellishments add. 


I appreciate you stopping in for a look at my work using that oh so yummy September Kit. To grab some of the latest and greatest scrapbooking elements out there, all you have to do is subscribe to our monthly kits, and they will arrive right at your mailbox, all ready for you to create. I love working with the Scraps Of Darkness Kits and Add Ons!!! It really is the easiest and most economically way to build your stash, hone your skills and take your papercrafting projects to the next level. Hugs, ~Renea

Thursday, September 19, 2013

Making A Little Magic With Tresors De Luxe~


Good morning everybody! Today, I would love to share with you a little magical fairy tea cup that I created using trims and flowers from the Tresors De Luxe Etsy Shop. I just love creating, whimsical and magical pieces that remind me of things from my childhood, and these little embellished tea cups allow me to do just that!! I used the following Tresors Items:
  

Carnation Pink Venice Lace LA-128

Pink Fabric Flower Spray with White Pearls PF-041

and you can download, and create your own little piece of magic with the tea cup template here:


I started with the template that I printed out onto some cream texture cardstock.

I then stamped the card stock and then put my little tea cup and saucer together. I added a fussy cut teacup and roses image that I Mod Podged onto the cup, then I added Tresors lace to the rim and bottom of the cup.


I created a little tea bag, by upcycling one of my bags from my morning cup of tea, letting it dry, and then slitting the bottom and emptying the grounds out. I then stamped it with a butterfly image, added some Tresor lace at the bottom, a Tresors rose at the top, and a little button to the twine. 


I love to collect little empty bird's nests to tuck into my cups. I then took a Vintage image cut it out, blinged it up and added some of my hand crafted butterfly wings to create my "fairy". I added in some tresors flowers, and some of the little sprays that gave a whimsical garden feel to my project, and  I tucked in a Prima birds nest, a little rhinestone button, and added on one of my Spun Sugar Glitter Glass Butterflies from my Reneabouquets Etsy Shop


Here is a top view of the details.


And here is a close up of all the Tresors details.

Every girl needs a little magic in her life, and Tresors De Luxe is the perfect way to add some magical touches to all of your handcrafted projects. 

Thank you for the visit and now it is time for me to wave my magic wand and fly on out of here~until next time ~Hugs~ Renea