Friday, September 9, 2011

Live Brightly

Lisa (aka Raining) hosts a Round Robin over at Scraps Of Darkness, and boy do I love to play along! This month I had the pleasure of being on Team 1 with :

Sarah (chaton_13) :


Cheryl (C Mom Go):

and Ashley (Ashleyvanetten):


With so much gorgeous inspiration to reference and lift, creating something wonderful was no chore at all!

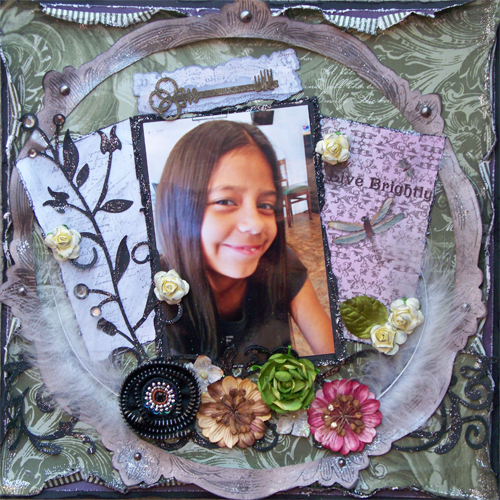
I created my layout by squeezing my Scraps Of Darkness August Kit-Envy for one last layout. It features a photo of my God-Daughter, Michelle, with her oh so handsome son, Mason. Mason is one of those kids who just steals your heart away the instant you meet him-can you say ADORABLE! I started with a piece of stash pp that I distressed and inked. I then used a template to create 2 graduating circles from some kit pp and a piece of add on card stock, inking and distressing the edges with TH ink and some of the green chalk ink that came in the kit.

 I then created one side pieces with kit pp that I inked, distressed and used one of the Robin's Nest rub ons from the kit on.Then I made a second side piece, using some card stock from the add on that I masked and spritzed with the stunning copper mist from the color add on, and then used another rub on, to decorate this piece as well. I matted the photo using the same ivy pp that is was used for one of the large circles, distressing and inking the edges.


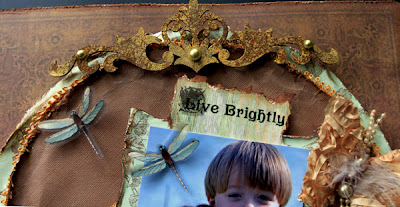
I then took some of the packaging from one of the kit embellies and tore the edges, inked and distressed it and used the "Live Brightly" rub on from the kit to create the title and then positioned my photo on top. Next I took a piece a Dusty Attic flourish and embossed it using a stamping process, and attached it at the top of the circles.  To view a step by step and detailed explanation of this embossing process, check out my Embossed Chipboard Tutorial.


I created a large flower layer across the bottom using the Lime, Petaloo flower and the Petaloo Velvet Hydrangeas from the Flora & Fauna add on, and one of the Vintage Golden Goddess flowers from my Etsy Shop. I then took one of the sweet Melissa Francis frames from the Romance add on and popped a tiny dragonfly rub on from the kit, on to the top, and tucked it into the flowers.

 To finish up the layout, I popped one of the Prima Butterflies from the Flora & Fauna add on next to the photo and then rubbed 2 of the dragonfly rub ons onto transparency paper, fussy cut them out and adhered them with foam tape for dimension.

Thanks for letting me share my Round Robin layout with you! And a huge thanks to my Team Mates, Sarah, Cheryl and Ashley for their inspiration! ~Hugs Renea


Wednesday, September 7, 2011

Raised On Country Sunshine-Twisted Sketch#118 Twist Green

The following is a layout that I created using a photo of that sweet little Emmie when she was about 18 months old. When I saw this photo on my cousin Becky's Facebook, I just had to have it to scrap. Well the perfect pps came in this month's Scraps Of Darkness Envy Kit and I was able to get the idea that had been inside my head onto paper. I used this weeks Twisted Sketch #118 with the Twist-Green for inspiration, as well as a song that popped in my head as soon as I saw this photo of Emmie-"Raised On Country Sunshine" by Dottie West. The lyrics remind me of growing up at my Granny's house, where we didn't have much, but we did have a lot of love. We didn't have indoor plumbing so in the summer you took a bath outside, either in the plastic kiddie pool or one of the big metal wash tubs. In the winter, you filled one of the big metal tubs up with warmed well water and took your bath by the wood stove. Our life was simple, and I know Becky was trying to capture some of that sentimental simplicity when she snapped this sweetie pie photo.

For those of you who do not know the song or the lyrics, here they are, and for those who know them by heart, I know you will recognize them in the layout:

You say you love me and its inviting, to go where life is more exciting
But I was raised on country sunshine
I was raised on country sunshine, green grass beneath my feet
Running through the fields of daisies, wading through the creek
You love me and its inviting, to go where life is more exciting
But I was raised on country sunshine
I was raised on country sunshine, I'm happy with the simple things
A Saturday night dance, a picture show and the joy that a bluebird brings
I love you please believe me, I won't want you to ever leave me
But I was raised on country sunshine
There's just something bout the morning that makes each day a joy to see
The nighttime brings a peaceful feeling that rests inside of me
I love you please believe me, I won't want you to ever leave me
But I was raised on country sunshine
You love me and its inviting, to go where life is more exciting
But I was raised on country sunshine
Mmm, mmm I was raised on country sunshine


I started the layout with a piece of yellow card stock from my stash, took a white piece of card stock and used some prima stencils and smooch mist to create the design. I then took a doilie and misted it green, then punched and distressed some of the Robin's Nest pp from the kit. To create the smaller circles , I used a Fancy Pants filter from the May S.O.D. kit and then punched and layered a kit pp onto it with foam tape for dimension. I then took another piece of kit pp and distressed and inked the edges and tucked it underneath the photo.


I took a stash Large white daisy and added a Petaloo flower from the kit to the center.

I created a peek a boo, and then punched some strips of kit pp and tucked them inside the peek a boo and under the top and side corners. I set some eyelets and laced green wire through them and then popped in a Vintage She Daisy from my Etsy Shop. I distressed the edges on the photo, used some rub ons for the word sunshine and the butterfly. I took some buttons and pulled green wire through the sew holes and curled the ends, then tucked one of the Blue Moon Trinkets from this month's Romance add on beneath sunshine.


I took a Dusty Attic Sign Post and painted it white then used some leftover Christmas rub ons to decorate it, randomly painted places with some yellow puff paint, added some green bling,  rubbed on the word country, and popped on one of the mini roses from the kit.


I took some corrugated flowers from my Etsy Shop, painted and grunged them up then popped some of the Vintage She Daisies into the centers, but out some swirls with my Sizzix and popped on some Prima Pearls. Then to finish out the title, I took some stash bottle cap letters, painted the sides with yellow paint, then spritzed them with green mist and popped them on.

No matter where life takes me, I still enjoy the simple things most of all. I hope that you have enjoyed this layout of Emmie, and that you take the time to slow down and walk or run through fields of daisies, and feel the sunshine on your face. Big Hugs, ~Renea

Tuesday, September 6, 2011

"Tell Me What You Want!" Blog Giveaway

O.K. girlies in honor of  the fact that I have been scrapping for a year now, have almost  150 followers, and that I just love all the scrappy friends that I have made, I am going to do a blog giveaway! I wanted to come up with something fun and unique, so I came up with the idea to let you tell me what you want. The following are the rules:

1. Follow my blog
2. Visit my Etsy store and pick out some of the things that you would like to have- http://www.reneabouquets.etsy.com
3.Come back here and leave a comment to this post,  telling me "what you want"

It's that easy!

On September 24th, I will put all the entries into a random draw, and the winner will receive $25.00 worth of things that they said they wanted.

Have fun and don't forget to "Tell Me What You Want!"

Friday, August 26, 2011

What's True Is True

The following is a layout that I created with my Scraps Of Darkness August Kit-Envy, plus some pieces from past kits, and it is based on a song that my husband, and I wrote together. He came to me with this fabulous, artsy idea and he had the music and some of the lyrics down, and wanted to know if I wanted to help him fill in some of the lines, and I immediately jumped on it, because it was right up my alley. Very moody and dark with a twist. The song is about a woman, who at first you think is reflecting about someone she is in a relationship with, but then you realize she is looking into the mirror, reflecting on herself. The following is the lyrics:
 
mirror mirror
tells only the truth
While keeping my secrets
safe in this room
lost in the shadow
nothing seems clear
face to face
a stranger appears

Chorus:
ONE GLIMPSE
THAT CAN SHOW ME
JUST ONE LOOK
TO REMIND ME
THERE’S ALWAYS A DIFFERENCE FADING
TO WHAT’S RIGHT TO WHAT’S WRONG
LOOKING THROUGH LONELY EYES
TO THE BACK OF MY MIND
WHAT’S TRUE IS TRUE
I CAN’T MAKE YOU LOVE ME
WHEN YOU CAN’T SAY YOU LOVE ME
WHAT’S TRUE IS TRUE

THIS LOOKING GLASS
HAS A HANDLE TO HOLD
I PULL IT UP CLOSE
WATCH THE TRUTH UNFOLD
BUT THE TRUTH IS I’M LYING
THE SECOND MISTAKE’S
LIKE THE FIRST ONES I MADE
ARE ALL VERY PLAIN LIKE THE LINES ON MY FACE
NEVER LEARNING
Chorus:
Repeat


Bridge:

THE REFLECTION REVEALED
FEELS COLD ON MY HANDS
GUILT WRAPPED UP IN SHAME
TRAPPED IN THE FRAME
WAITS THE GHOST FROM MY PAST

I CAN’T MAKE YOU FEEL
INSIDE WHAT I FEEL
I CAN’T MAKE YOUR LIES
BE TRUTH FROM YOUR LIPS
I CAN’T MAKE TODAY
BECOME YESTERDAY
WITH A MAGICAL GLASS
FROM A FAIRY TALE PLACE
I CAN’T MAKE YOU LOVE ME
YOUR ANSWERS ARE WRONG
SO BACKWARDS AND FAKE

I CAN’T MAKE YOU LOVE ME
NO YOU CAN’T SAY YOU LOVE ME
WHAT’S TRUE IS TRUE


I started with a piece of stash card stock, then punched the gorgeous black and purple Robin's Nest
pp from this month's kit. I then took and mixed gel medium with acrylic paint and stenciled the design onto the pp. I took a piece of stash black card stock and punched a circle from it, took some more pieces of card stock, inked and distressed the edges and then layered them in behind the photo. I took one of the Pink Paislee mistables from this month's kit, misted it with some of the Colorinz Mist from last month's color add on, added some stash Prima pearls and tucked it into the card stock layers.


 I then distressed the edges of the photo and wrote my title onto the mirror in the photo. I added two glitter butterflies to the corners, for dimension.


I created a strip from a stash piece of card stock, punched it, set some glitter brads and did some lacing with some white ribbon that I dyed black. For the bottom collage, I took gel medium mixed with acrylic paint and made a layer. I then took some of the Pink Paislee Mistable Fuzzy stickers and created a collage. I painted each piece with the H20's from July's color add on, and then spot painted the acrylic paint with H20 and Tattered Angels black glam to get a multi-dimensional, yet monochromatic look.

I added a Prima trim piece from May's kit, then took a Chipboard Corset that I purchased from the Scraps Of Darkness store, painted it with TA Glam, added some glitter glass and then laced it with some purple embroidery thread. 


I took the Prima pink flowers from the kit and painted them violet with the H20s. I then cut out some leaves with my Sizzix in black and hand detailed them in pale purple paint.


For the final touch I distressed and pushed down the upper left hand corner, tucked in some tuile that I hand dyed, and added a piece of chipboard that I painted with TA Glam and then took one of the mini roses from the kit, painted it with H20s and popped it in the center.

Wow, I did not realize that I did so much painting and technique work until I was typing this out. I love to paint and doing these really artsy pieces is one of my favorite things to do. I encourage you to pick up a paint brush, grab some color and see what happens. You don't have to be a Rembrandt to enjoy the art of painting! ~Renea


Wednesday, August 24, 2011

Twisted Sketch #116 Twist Metal-Favorite Things

Wow, this week has flown by! I can't believe it is Wednesday already, and time for another Twisted Sketches reveal! The following is this weeks sketch and the Twist is Metal:


Below, is my interpretation of that fabulous Sketch, and here is one of my favorite quotes that inspired this layout:

"You... were created to be loved. So for you to live as if you were unloved is a limitation, not the other way around... Living unloved is like clipping a bird's wings and removing its ability to fly... A bird is not defined by being grounded but by his ability to fly. Remember this, humans are defined not by their limitations, but by the intentions I have for them; not by what they seem to be, but by everything it means to be created in my image. Love is NOT the limitation; love is the flying. I AM love. "
William P. Young (The Shack)


I used my gorgeous Scraps Of Darkness August Kit -Envy to create this layout that features a few of my Favorite Things. Both photos are of things that my amazing husband of 21 years has gotten for me. The first favorite thing is my Old Country Roses Tea Set. When I was a little girl, I had a friend who was elderly, Mrs. Frailey. She was a widow, who had once traveled the world with her husband, and had a collection of beautiful tea cups from different places that they had visited together. I loved going to her home and spending time with her in her rose garden. She would fix me chocolate cupcakes, and let me eat them warm-no icing-just like I loved them, and serve me tea in one of her precious cups. She always knew how to make a little girl, who came from a family that didn't have much, feel special.  That relationship with her shaped so much of my life, and is where I get my love of all things vintage from.  My husband, knowing how much I love these things, took me to purchase that tea set. We had just moved into our new home, and I was about to host a girlfriend party, and he surprised me, by taking me shopping to pick out the tea set that he knew I so dearly wanted. The second photo is of my Staffordshire Dogs. Again, Mrs. Frailey had owned a pair of these beautiful dogs, and my husband had heard me talk about them, and knew that I secretly browsed the internet looking at them from a distance. One Christmas morning, we got up and started letting my son unwrap his presents. We don't normally buy for one another at Christmas, but there was a large box for me, under the tree from him. I unwrapped it  and there they were a set of real, copper painted Staffordshire dogs! He had found an auction house in England that had an estate set and had purchased them and had them flown in for my Christmas present. I cried like a baby. I don't think anyone has ever done anything so thoughtful for me in my whole life, but that is why I love him, he always knows what is in my heart and does everything he can to make my dreams come true!

The first thing I did was to take the shape in the sketch, and create 3 graduating templates in that shape for my layers. I don't have a Cricut, so I just drew the shapes out onto chipboard and cut them out. I started with one of the pps from the Envy kit and then traced the template shapes onto some stash card stock and some of the cream card stock from this month's add on. I inked, and distressed the first 2 layers and on the 3rd layer, I used a stencil and misted the pattern onto it. I then took some stash, pleated ribbon and tucked it in under the 1st and 2nd shape layers. I placed the photos on to get the began building detail.


I used a couple of the Petaloo flowers, and some of the mini roses from the kit to create 2 flower layers and tucked in some pieces of a  ZVA piece that I had in my stash. I stuck the stick pin that our super talented sister, Mandy (craftysprinkles) made for the Romance Add On, into the bottom flower layer, and I handpainted a Dusty Attic Teapot and tucked it into the top flower layer. I then used a Tim Holtz bird metal adornment that I gesso-ed and used some Mica from the color add on to soften. This was one piece of my metal twist.


Next I started adding adornment to my top photo by cutting out a photo corner from the Webster Journaling Cards that came in the Romance Add On, and attaching it with foam dots for dimension. I took some stash Melissa Frances pearls and added them to the upper corner. I then hand painted some of the Dusty Attic tea cups and stacked them on the side of  the opposite corner.


I took a Dusty Attic Wrought Iron piece and painted it then used rub ons to gussy it up.


For the bottom photo I did the same steps, the only difference is that I used a Journaling Card that had the words favorite things on it for my title. 
I then took some more of the journaling cards and ribbon and created a mini journal and wrote the thoughts that I talked about to you, inside of it and tucked it into the bottom corner.

For the finishing points, I added 3 little metal buttons (another piece to the Metal Twist) that I gesso-ed  to the upper left corner, and then cut some strands of pearl trim and tucked them into opposite corners.

It is amazing what having people, who treat you special, in your life can do. It can change everything. I am grateful that along the path of my life, there were people who were willing to do just that. Find a lost soul, show them some kindness, and give them their wings to fly. ~Renea


Tuesday, August 23, 2011

Scraps Of Darkness Is Being Featured At Creative Imagination's Blog

All of us over at Scraps Of Darkness are stoked that we are being featured on the Creative Imagination's Blog! Our very own Lisa (aka Raining),  worked very hard to bring us to the attention of Creative Imaginations, and they have decided to do a 3 day feature on us!
There will be 3 days of posts, with 2 posts each day, featuring some of the beautiful work by our fabulous Design Team. Today is the first day, and we are not sure of which days the other two will be.
Here's the link if you want to check it out: http://creativeimaginations.typepad.com/creative_imaginations_blo/

Thank you Lisa, for making this happen, to Mel, for giving us such an amazing place where we can scrap like ourselves, and color outside the lines, and to the whole Design Team for the gorgeous work that made Creative Imaginations take notice!

Sunday, August 21, 2011

SCRAPS OF DARKNESS AUGUST STALKER CHALLENGE

Each month, I host a Challenge over at Scraps Of Darkness  called the Stalker Challenge. This month's challenge invites the participants to stalk the internet for a card sketch, card artist, or the recesses of their mind for an idea to help them to come up with a card. The card doesn't have to be anything fancy or elaborate, I just want them to try something new or if they already make cards to share what they know.
The Rules:
1. Use at least 50 % Scraps of Darkness product. This can be kit product or store product.
2. Make the card using scraps leftover from another project.
3. Use distressed layers.
4. Include some fussy cutting
5. The most important rule of all-HAVE FUN!!

Here is my example for the challenge using Rule #1-at least 50% Scraps Of Darkness product:


Rule #2  Use your leftovers: I used my leftovers from my Now layout. I love the brown and green color scheme and didn't want to waste not one little bit of those pps. The bottom layer is a leftover piece of the brown cardstock from this month's add on. The 2nd layer is a piece of the green foil pp from the kit. The 3rd layer is one of the Pink Paislee mistables from the kit. The 4th layer is a piece of the leftover cream card stock that I had misted with the Lindy's mist from this month's color add on, and the image is a free one I found online.


Rule # 3-Use distressed layers: I distressed all of my pp layers and inked the edges . I even took one of the Webster's Pages Journaling Cards and cut out the sentiment, then tore and inked it's edges for my card sentiment.


Rule#4-Include some fussy cutting- I took one of the Webster's Pages Journaling Cards and fussy cut out some of the flowers and adhered it to my photo with foam tape for dimension.


For detail, I added some trim from my stash. In the process of cutting the trim some of the little seed beads fell off, so I just took them and glued them to the upper right hand corner for some added detail. I then took one of the glitter brads from the kit and attached it on top of the trim.


For the inside of the card, I used some more of the cream card stock from this month's add on, distressed and inked the edges, then stamped the outside edges with a script stamp and left the inside blank for adding the sender's message.

Rule#5-Have Fun!!! I definitely got this one in! I just love making cards to give to my friends. They don't have to be fancy, just made with love!! ~Renea