Wednesday, October 17, 2018

Do You Love To Swap?? Sweet Mini Canvas~

Do you love to do swaps? I do!! It is so much fun to create and receive little works of art between friends! The following is a Mini Canvas that I created for my Reneabouquets Artists With An Edge Group, October Swap Partner-Toni Burks. 


I started with a 5 x 7 Mini Canvas and sprayed it with Tim Holtz Walnut Distress Spray Stain. I admit I am not a huge canvas artist, I am a paper artist, so most of my canvas got covered in paper 😉
The papers are from a sold out Blue Fern Collection~Wanderlust, and I distressed and heavily inked the edges with Tim Holtz Vintage Photo Distress Ink. I also created a corrugated board layer that I coated with Ranger Opaque Crackle Paste, let it air dry and then back bent the board to make really deep cracks and inked them with the Vintage Photo Ink do make them really pop!


I then scissor cut the bottom of the corrugated board in 1/2 inch strips and paper rolled those and then inked the curls with Tim Holtz Vintage Photo Distress InkTim Holtz Tea Dye Distress Ink and
Tim Holtz Weathered Wood Distress Ink.

All paper and board layers were attached with Aleene's Fast Grab Tack Glue.


I then took some of the inked Beautiful Board Heart Lattice Elements,


and layered a Tiny
Beautiful Board Lacy Heart Frame on top of it and cut the lattice to fit my heart shape, and then popped on one of the Teal Candy Pieces.


Roses from the following sets:
Tucking in a feather and a burlap string bow from my stash.


To add even more texture and depth, I created puddles with Judikins Diamond Glaze and then sprinkled on Chunky Glitter Glass Teal, and popped on some Beautiful Beads Hand Tinted Glass Beads In Teal~YUM!!


I took a sweet little wooden clothes pin (gifted to me by a past swap partner-Geena Marquez), inked it with the Vintage Photo Ink, and added that on below the dragonfly.


Here you can see all the texture and depth the layering and products created.


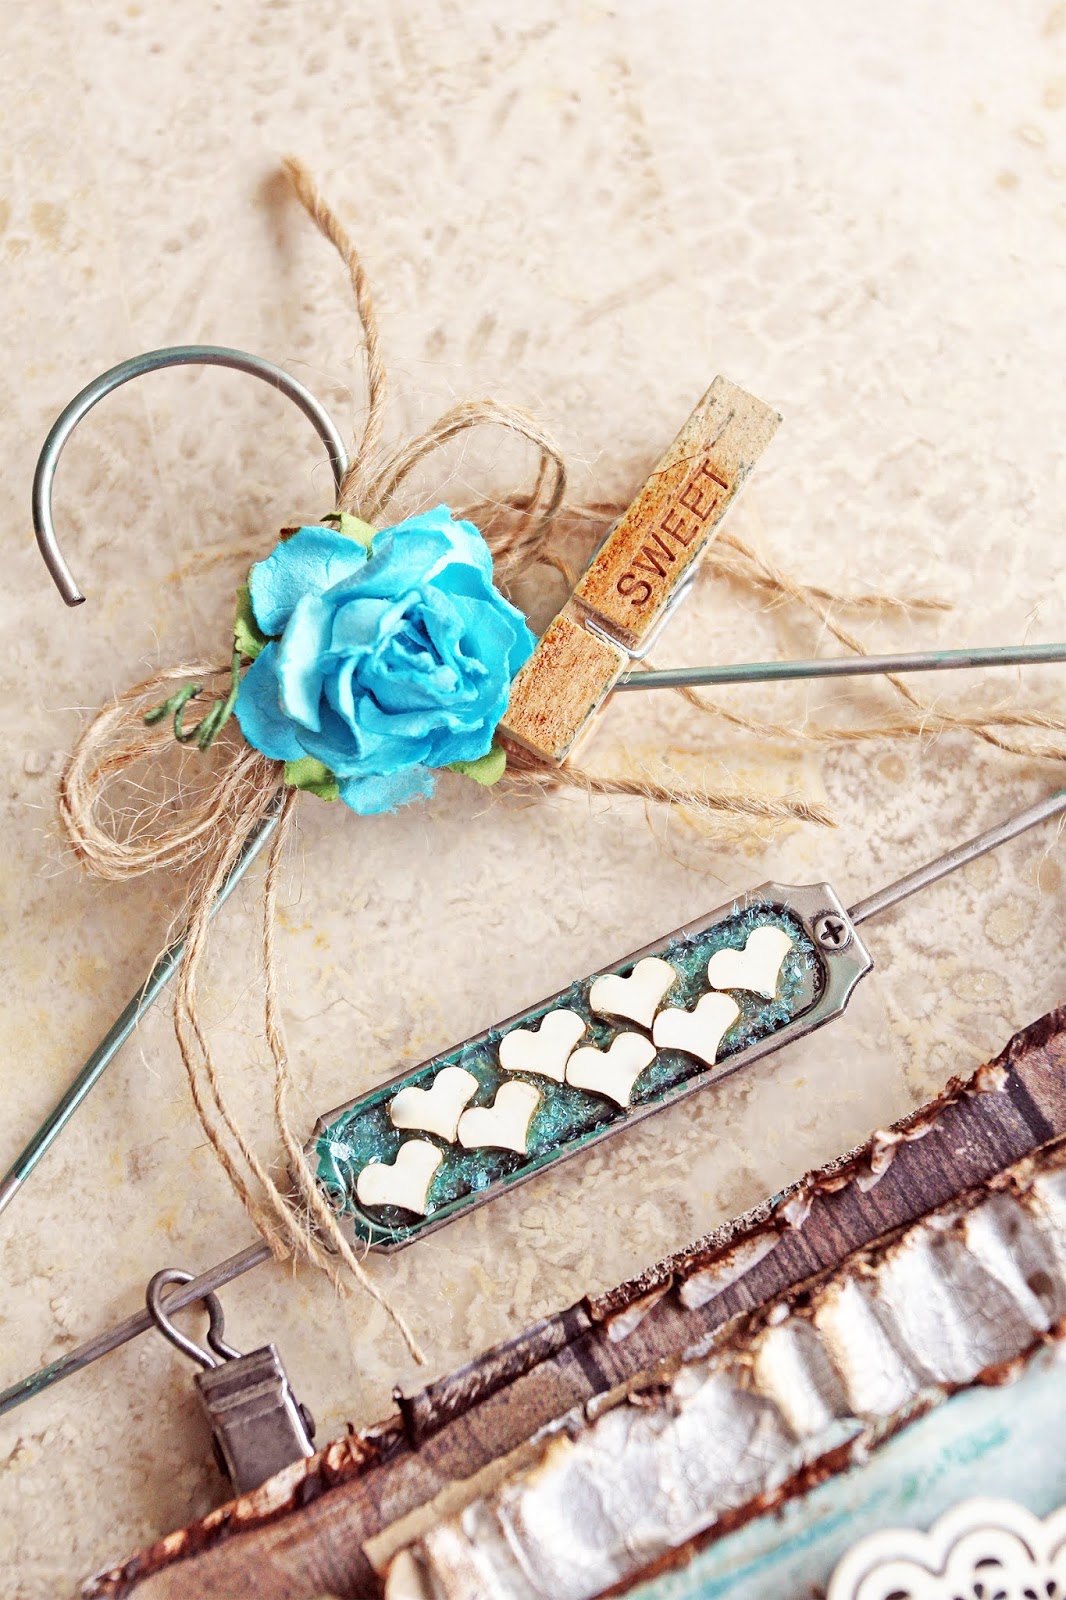
The last step was to add a little Tim Holtz Mini Display Hanger that I added one of the Mulberry Roses, burlap string bows and another clothes pin to. I added Chunky Glitter Glass Teal to the label holder and topped that with  Beautiful Bits Tiny Hearts.

I just love the Shabby Country Chic look of this canvas and I hope Toni loves it as well!!
Thank you for stopping by!! Hugs ~Renea

Products from Reneabouquets.com and the Reneabouquets Etsy used for this project:
Personal Stash Items:
Blue Fern Wanderlust Papers
Organic Corrugated Board
Burlap String
Feathers
Little Wooden Clothespins ( A Gift from sweet, scrappy friend Geena Marquez)


Monday, September 10, 2018

Fairy Dust Loaded Envelope~

Over on the Reneabouquets Facebook Artists With An Edge Group, Design Team Artist Julie Monroe is hosting a Summer Escape Challenge, encouraging us to try a new Mixed Media Technique. I wanted to take the challenge and decided to try my hand at adding Heavy Gel Medium to one of the pieces on my Loaded Envelope, a Printed Beautiful Board Lissie B. Darling piece to make her look like a giclée painting.


I used a small paint brush and added strokes to her hair and wings, dipping the edges of her wings into some Pearl Shard Glitter Glass. I then used a wide paint brush to add thee strokes on her dress.
And now Lissie was all painted up and ready to be added to my project!


All the paper on this project is from a Prima Cherry Blossom 12 x 12 Paper Pad.  I created a 9 Inch Tall x 6 Inch Wide Pocket from a 12 x 12 sheet of the paper. I then cut a second layer, distressed the edges and added that to the cover.


I ran some Sheer Romance Lace across the bottom of the pocket, and then added flowers from the following sets:


on, and then topped it with my giclée painted 


I created little puddles of the Pearl Shard Glitter Glass in the background, added the Diamond Chunky Glitter Glass sprinkled Dust Word from the Beautiful Words Sparkle, Fairy, Dust, Moment Laser Cut Chipboard Set , and popped on a 


I added the Diamond Chunky Glitter Glass sprinkled Fairy word from the same set topped with another Lissie Kiss to the top portion of the envelope.


Above the Fairy word piece, I created a little floral spot with matching flowers from the sets, and tucked in a sweet little fairy on a star charm and fairy orb from the Fairy Trinkets Set.


Here is the Envelope with all of it's treasures tucked inside, and 


this is one of the 2 double sided large tags, topped with White Beautiful Bows Lace and a rhinestone and pearl button from the Fairy Trinkets. The wand is a Beautiful Board Star Fairy Laser Cut Chipboard Pocket Wand that I sponge painted with gesso and then sprinkled with Diamond Chunky Glitter Glass, adding Silver Christmas Glitter Glass to the fairy's wings. The wand is accented with a hand dyed seam binding bow, a pink sorbet mini rose and the little fairy on the moon charm from the Fairy Trinkets set.


This piece is a tag that I created by coating a Beautiful Board Medium Lacy The Moon Fairy Laser Cut Chipboard with the Diamond Glitter Glass, adding some of the paper as backing, punching a hole and adding a seam binding pull.


Here you can see the envelope and all of its tuck ins!!
I love creating these type of projects! They are so much fun and all of the Reneabouquets Products make putting it together with a designer theme so easy!!

Thank you so much for landing on my blog and taking a peek at my art!! I am so grateful and hope that you find the time to create something beautiful for yourself!! Hugs ~Renea

Items used on this project that you can find at Reneabouquets.com and in the Reneabouquets Etsy:
Prima Cherry Blossom 12 x 12 Paper Pad
Printed Beautiful Board Small Cherry Blossom Laser Cut Chipboard Frame
Printed Beautiful Board Small Lissie B. Darling Laser Cut Chipboard
Beautiful Words Sparkle, Fairy, Dust, Moment Laser Cut Chipboard Set ( I used Fairy & Dust)
Printed Beautiful Board Lissie Butterflies Laser Cut Chipboard
Beautiful Board Star Fairy Laser Cut Chipboard Pocket Wand
Beautiful Board Medium Victorian Scroll Laser Cut Chipboard Accents
Beautiful Board Medium Lacy The Moon Fairy Laser Cut Chipboard
Butterfly Kisses Lissie Butterflies
Tiny Treasures Lissie Glitter Glass Butterflies
Fairy Trinkets
Sheer Romance Lace
White Beautiful Bows Lace
Prima Lavender Julienne Flowers
Pink Sorbet Mini Roses Mulberry Paper Flower Set
Pink & White Roses & Leaves Mulberry Paper Flower Set
Diamond Chunky Glitter Glass
Pearl Shard Glitter Glass
Silver Christmas Glitter Glass
Aleene's Fast Grab Tacky Glue

Wednesday, September 5, 2018

Get Your Sparkle On!


Get Your Sparkle On!! What girl doesn't love a little sparkle in her life??!! I created this card with lots of sparkle with products from Reneabouquets:


I started with a base that I created from some Prima Heaven Sent 2 Papers, added a layer of  Teal Tulle Trim and  White Tulle Trim,  then created a second layer that curled the bottom edges on.

I love the look you get from paper curling, and it is fairly easy to do. I just take a ruler and mark how I want to cut my strips, 


and then use a Bamboo Skewer (yes the kind you use to grill with) to roll the ends up on.
I then painted the curls with gesso and sprinkled them with Diamond Chunky Glitter Glass, and glued the layer onto the base over the trim.


Next, I painted a Beautiful Board Laser Cut Chipboard Gumball Machine with gesso and then heat embossed the silver accents, and then popped some Teal Tinted Glass Beautiful Beads  into the holes that were designed into the chipboard for them. 


Beautiful Bits Circles got a thick layer of coarse texture gel painted onto them.


And then a dusting of 
Diamond Chunky Glitter Glass
for that extra sparkle!


I added the circles randomly and then Glitter Glassed the paper edges for a really Sparkly look.


At the bottom corner, I added a Prima Misty Rose Paxton Flower Cluster.


Created a hand dyed seam binding bow, a little button and a White Fairy Orb.


I did not like the B-side of the papers, so I just covered the inside with some of the matching pink polka dot paper.


And then covered the back side with the same, matching paper for a finished, designer look!
I love how easy using all the Reneabouquets products made putting together this card!
You can really capture a unique look in just a few easy steps!!
Thank you for the visit and I hope I have inspired you to add a little Sparkle to some of your projects! Hugs ~Renea


Items that were used from Reneabouquets.com and the Reneabouquets Etsy on this project:
Beautiful Board Laser Cut Chipboard Gumball Machine
Beautiful Words Small Sparkle, Fairy, Dust, Moment Laser Cut Chipboard
Beautiful Bits Circles
Beautiful Beads Teal Hand Tinted Glass
Beautiful Beads Bronzed Teal
Tiny Treasures Sweet Pea White Butterflies
Teal Tulle Trim
White Tulle Trim
Diamond Chunky Glitter Glass
White Fairy Orb
Aleene's Fast Grab Tacky Glue
Prima Misty Rose Paxton Flowers

Monday, August 27, 2018

Goodbye Summer Layout~

Summer is slowly waning to a close, and I couldn't let it get by me without doing one Summer themed layout. I created this layout using products from Reneabouquets. The only thing that is no longer available is the sold out Blue Ferns Wanderlust Papers. 


I started with a base layer of papers and then tore the second layer to reveal parts of the paper underneath. I then did some distress punching and folding to get a really textured look to start adding embellishments to. I tucked pieces of a Beautiful Board Diamond Elements Laser Cut Chipboard randomly under some of the tears of the paper.


Next, I did a double stack of corrugated board and then glued matching paper to it to get the dimension I wanted. I added my photo to the stack and then topped it with a Beautiful Board Medium Laser Cut Chipboad Seashell Frame and I added some Beautiful Beads Bronzed Teal Iridescent Pearls to the frame as accents.


I exposed the ridged surface of some corrugated board, painted it with Ranger Opaque Crackle Texture Paste, let that air dry to let the crackle develop. Once the paste was dry, I then cracked it even deeper by bending the board. I really love this look and use it a lot!! I inked over the edges and cracks with Tim Holtz Tea Dye Ink to get an aged look. Next, came layers of  Mermaid Shard Glitter Glass and Pearl Shard Glitter Glass topped with Beautiful Beads Bronzed Teal Iridescent Pearls and 

Beautiful Beads Hand Tinted Teal Glass 


I ran cheesecloth across parts of the layout, and at the bottom corner of the frame added flowers from the following sets:
White Curly Roses & Leaves Mulberry Flower Set
and then added a real sea shell for visual interest.


I added some Beautiful Board Starfish Laser Cut Chipboard, painted some accents onto the starfish with ink. and then added more flowers and seashells.


Little random spots of matching flowers, cheesecloth, Beautiful Beads and Shells, add lots of texture and dimension along with the Handcrafted Tiny Treasures Into The Mystic Glitter Glass Butterflies.


Here you can see all the dimension and texture that I captured with the RB products!! I actually design, draw and manufacture my products and this gives me control over adding the things like intricacy and textures that artists crave!!

Thank you so much for coming by to say Goodbye to Summer with me!! I hope you find time to enjoy what is left of it!! Hugs ~Renea