Friday, September 13, 2013

Getting Creative With Scraps Of Darkness~

This month the Scraps Of Darkness August Kit~Rustic had a Creativity Kit that featured a really cool off the page Cook Book/ Recipe Book package. I just adore all the FarmHouse Country Kitchen items in the Kit, Add Ons and Creativity. They remind me of my Granny's kitchen and just make me feel right at home. 

I had seen some of the cutest Apron Cards done by a paper craft artist, Angela  Poole, and when I saw this add on, I knew that I wanted to do one of those little aprons for the cover of my Recipe Book. If you go to 
you can pick up one of the free downloadable templates for the card.


I wanted a really distressed country feel so I did a lot of distressing and Vintage Photo Inking, distress embossing, and used an eclectic mix of the papers, colors, and trims to get that Country Kitch look.


Here you can see a close up of all the layering on the apron, and distress embossing detail that I did on the cherries and the lettering.


Backside of the book.


A side view of all the distressed layers that give it that time worn look that I love.


On the inside cover I created a pocket page with little recipe cards, mini paper clips and clothespins for holding notes. I then created tabbed index page for "Appetizers" with a little toggle pocket for storing more notes. 


I loved that the kit came with some pre printed Recipe pages. I actually downloaded the pdf file and printed them double sides onto a cream cardstock that I then distressed and inked to match the look of the rest of my book. I did 7 double sided pages per each section.


This is the tabbed index page for my "Main Dishes" section with a little velcro close envelope for storing notes. 


This is my tabbed index page for my  "Desserts"  section with a little file pocket and little wooden clothespins for holding notes.


And this is the back pocket page with some more of the cut out recipe cards and mini paper clips.

I grew up in a little farm house that was short on room, but large on love. This book reminds me so much of where I came from. Yes, I am a Country Girl through and through! I spend most of my Summer weekends, canning, freezing, making jellies and salsas, and yes, I love to cook! I also love to eat, so I had so much fun putting this little slice of Country together, and I hope that you have enjoyed seeing what I did with the Creativity Add On. 

Thanks for dropping by, and if you were close enough to drop by in real life, you could sit down for a slice of  pumpkin cake that I just pulled out of the oven a few minutes ago. Oh well! I will have a slice for you :) Hugs, ~Renea


Tuesday, September 10, 2013

Adding A Rustic Touch With Tresors De Luxe~

O.K. so we all know that Tresors De Luxe laces, flowers, and embellishments are perfect for  feminine, Shabby Chic, and Vintage projects, but today I am going to show you that they can also be used to add a more rustic look to your work. I teamed some of the Tresors pieces together with the Scraps Of Darkness August Kit~Rustic to create a layout with an old world, rustic charm. The photo is a Vintage 1931 photo of a little Hungarian Gypsy boy toting a cello, and I just loved the old world look of this photo and had to scrap it. 


I used the following Tresors De Luxe Items to create this look:

Ivory Venice Lace-LA056


I created lots of texture with gel medium and misting the background with a stencil, making paper rolls and then wrapping them with pieces of Tresors Lace, and adding frayed burlap pieces. 


Here I created a floral piece using the Tresors, Shabby Flower Embellishment, Tresors Lace, and some of those sweet Tresors Fabric Roses with some other flowers, foliage, burlap and burlap bird. The butterflies you see are some of my personal favorites  from my Reneabouquets Etsy Shop~they are my Secret Garden Glitter Glass Butterflies


Here is a close up of all that Tresors goodness!


I also used one of the Tresors Fabric Roses in the top floral spray.


And here you can see all the dimension and texture that was created with all those Tresor Touches.

Thanks so much for stopping by and I hope you have a great week!! Hugs, ~Renea

Sunday, September 1, 2013

Scraps Of Elegance Reveals It's September Kit!!


When I got my Scraps Of Elegance Design Team package and add ons, I think you could hear me squeel a mile away!! It was so full of Shabby Chic deliciousness that I just couldn't contain myself-lol! My neighbors already think I'm crazy and I think that squeel confirmed it for them. The kit is appropriately named Simply Shabby Chic, and if you are a lover of all things Chic & Shabby then this kit is for you!!


As usual Charlotte (Suepup) has provided us with an uber beautiful sketch:


And here is my take on the sketch: 


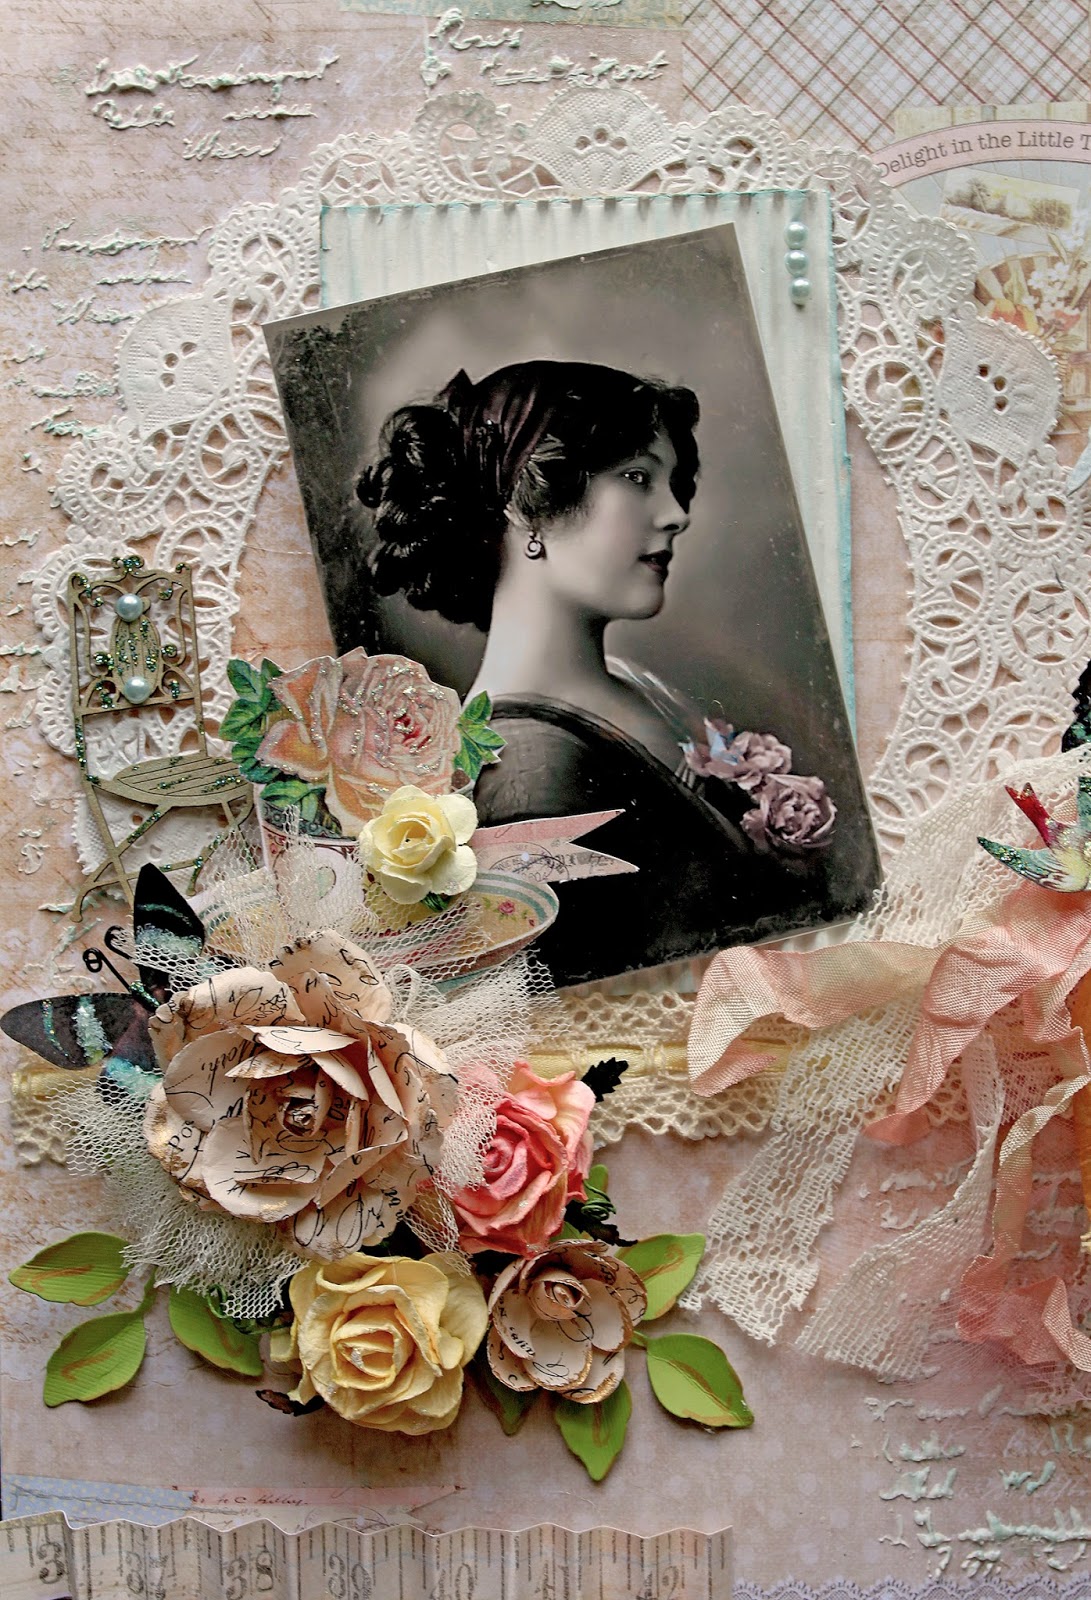
I started with a layer of paper then overlayed it with another layer, that I then exacto knife cut out the pattern in a way that I could then pleat the paper and have the section with the roses stand out.  In the background I did some modeling paste and stencil work, and then I accented some of the roses with glitter paints. 


There is a Doilie layer, and then a painted and inked corrugated board piece that I added some of the ZVA pearls from the kit to, and then set my photo on top at an off angle.  There is a little chipboard chair from the E.A.O. that I glitter paint, and pearl accented , tucked in to the flowers. 


On the side where I did the pleating, I tucked one of the Prima tags from the kit for journaling. I gesso'ed and glittered up some Tim Holtz Weathered clock hands and accented them with one of the little yellow roses from the kit. I then took layers of hand dyed seam binding and old curtain panel , cut into strips and made ribbon layers, that I topped with one of the Prima Buttons from the kit, a little glittered up fussy cut bird from some of the papers and one of my upcycled tea bags that I stamped, added one of the kit pearls to, as well as some stash Prima trim and another one of the little kit roses. I tucked in one of my Breathless Glitter Glass Butterflies from my Reneabouquets Etsy Shop to finish that side out. 


Here is a close up of the pleating and dimensional stenciling.


Here you can see were I fussy cut out pieces from the kit papers and glitter paint accented them, then layered in flowers from the kit, my stash, and the Flora & Fauna Add On, along with some die cut foliage, and another Breathless Butterfly. 

This month we had a Mini Album Add On for the kit that I just could not resist, and I am glad that I didn't because I think it is my FAV mini album that I have done so far. I was telling the SOE girls that I got a little carried away!! I just got to piling, and stacking and didn't know when to stop!! I then had to remove some things, because my album was so fat it wouldn't close-lol!! 


The cover is this gorgeous gate design, and I did tons of technique work on it, I first painted it, then I added a pink crackle finish to it, then I did some script stamping, some puffy paint texturing, and some seed beed puddling. 


The closure is this jewelry piece I found on sale that I inked, pantina alcohol inked, gesso'ed and heat up to set the mediums to the metal. It is adhered to one side of the gate, and then on the other side I used velcro for the closure.


The pink seam binding on the D-rings and throughout the album was from the Album Add On, I also added some Tulle scraps and ribbon scraps from my stash. The vine you see was hand crafted by me using some hand tinted mulberry roses and leaves, and then the other flowers were from past SOE kits.


The butterflies are my Oh So Pinkalicious Glitter Glass Butterflies that were created just for this kit and will be available soon in my Etsy.


I had this little broken wooden bicycle that was in my stash, so I glued it back together, then painted it in layers of color, then embossed it with some metal powder and added lots of mini roses from my stash. 


The little girls that I tucked in to the flowes on this side were fussy cut from some of the Paper Add On papers, then I coated them in Diamond Glaze that came with a past kit, to make them more durable. 


Here you can see all the painting, stamping, and seed bead layers.


Even after a shake down, my mini is still quite non-mini!!


This album opens up so gorgeously, swinging out to reveal each layer. 
I made little pockets from some of the Embellishment Add On pieces, and tucked in tags from the kit, and a stamped dress form I added little flowers from the Mini Album Add On, and created spaces for photos.


The "windows" throughout the album actually allow you to slide the paper pieces out, and attatch small photos, slide them back in, for a beautiful photo display.


I turned all the front sides of the panels into pockets and then created tags from the Prima cards in the E.A.O., and the silk bias from the Mini A.O. for double sided pull outs that you can journal or add photos to.


This is the next set of pages. The small white trim was included in the Mini Add On.


You can unclip the note cards from the alligator clip for journaling and photos, and I have some more pockets with tuck ins, and a little piece on a close hanger clip that can be removed for double sides journaling or photos. 


There is a little notebook that I created by rounding the corneres of some left over paper and stitching them together. The cover has one of the little frames from the mini add on, a Vintage photo and little M.A.O. flower.

Here you can see where I stitched it together.


This is the 3rd set of pages, that have lots of spaces  for jounaling photos, and little toggle close envelopes for storing treasures.


And this is the last set of pages with little pockets, ticket and tag tuck ins, and little window photo frames.


And finally, the backside. 

If you made it all the way through that thread, then you are a true scrappy friend, and I am so very grateful that you took the time to check out my reveal day work! I hope you are enjoying your Labor Day weekend, here are some sunny Southern hugs for you~Renea


Saturday, August 31, 2013

Make It In Minutes~Country Kitchen Tag

Does your life look like this~busy, busy, busy? As a wife, mom, multiple business owner and avid paper crafter, I certainly know the feeling, so over in the Scraps Of DarknessScraps Of Elegance Forums, I create a monthly "Make It In Minutes" segment that shows you how to make a project in 15 to 20 minutes, so that you can do what you love in a small time frame. 

This month, I have a tag that was created with the Scraps Of Darkness August Kit-Rustic and the Embellishment Add On for that kit. I love tags, they can be given as gifts, used to decorate a gift or your home, and if you were lucky enough to get the Creativity Kit for this kit, you can use it to add in to your Recipe Book.

Here is what the finished project will look like: 


For step by step directions on how to make this tag in minutes, please visit the Scraps Of Darkness/Scraps Of Elegance "Make It In Minutes" Forum thread here:


Here's to lots of creating in what little time us busy women have!! Hugs, ~Renea


Tuesday, August 27, 2013

A Head Start On Christmas With Scrapmatts Chipboard~


Hello everybody and welcome to my monthly Design Team reveal for Scrapmatts Australian Chipboard!!
For one of our DT criteria we were asked to get a head start on Christmas by making a set of simple Christmas Cards. As you know my style is pile it high and spill it over, so although it was a challenge for me, I think I managed to keep it fairly simple. 


I chose a Vintage theme and used some Vintage blue-greens, browns and golds. I did lots of distressing, sewing, and used inked up corrugated board to add in the dimension and texture that I love. 
The sweet Vintage images you see are some that I purchased from DigitalCollageSheets.com, one of my fav places to get high quality images that I sometimes colorize and use on a lot of my projects. 

The snowflakes are Scrapmatt's CB1181 Snowflakes 04 that I inked up and then added a ZVA pearl center to. I made some hand dyed seam binding bows and added a snowflake for each card to the center for a soft, yummy look. 

The "Merry Christmas" sentiments are Scrapmatt's CB1102 Words22 Merry Christmas that I embossed with some Lindy's embossing powder. 

And here are some closeups of each card so that you can see all the details, and how those Scrapmatts chippies add just the perfect touches.


This next project is a masculine over sized  tag that I created for the "Father's Day" criteria we were given to create with.  I used one of my past Scraps Of Darkness Kits along with Scrapmatts to create a travel themed tag that would be perfect for any of the men in your life. 


For the hanging ribbon, I used burlap then added in a metal Tim Holtz tag and swivel clasp, then topped it with one of the  CB1209 Scrap Words 12 , which was perfect for the travel theme of the tag. 

I did lots of stamping with puff paint to get that grungy texture that I love on my masculine pieces, fussy cut out the sign and hot air balloon from some papers that I had.


I then distress embossed the CB5106 Chevrons 01 inked them, and added them on for a nice masculine feel. I set some brads and wrapped twine around them just for a little extra texture.


And here is the back side.

Thank you so much for joining me for my Scrapmatts Reveal! Those amazing chippies make putting together a card or tag for any occasion a breeze with all the different styles they offer, and the fact that you can get them in their raw form and then decorate them to suit your own style!! 

Hope you have a creative and wonderful week! Hugs, ~Renea