Wednesday, November 2, 2011

Twisted Sketches Reveal -Frightful Fun- Sketch #126 Twist Feather

It is my week to do a layout using the Twisted Sketches fabulous Sketch #126 with the Twist Feather! If you are like me and love a great sketch every once in a while to inspire you to create, then head over to TwistedSketches.org for some of the best sketches around.

The following is my take on the sketch, and features a photo from just a couple of weeks ago of my son and some of his friends at the Ruby Falls Haunted Cavern. They had a blast, and I just had to scrap the fun group photo of Draven and the gang. BTW Draven is the one on your far left. I used my beyond gorgeous Scraps Of Darkness October Kit-All Hallows' Eve and just loved using all the spooky elements of this kit!

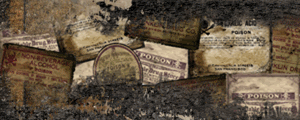
I started with some of the Fancy Pants kit pp and then added a piece of pp from my stash that I cut the center out of and just used the frame part to create that haunted house look. I cut out some of the apothecary bottles from the Moxie kit pp and misted them with different colors of mist, and then adhered them down the side of the frame with foam tape for dimension.
 I then took a piece  of pp from this month's Paper Add On and punched it then mounted the photo of my teen age spooks onto it. Pulled a large bat off of a Prima piece that was in the Flora & Fauna add on, and popped it at the top of the photo.  I took the die cut pp from the kit cut it in half, and smooched it with some teal smooch to tie in with the pp behind the photo.
Next I took a Dusty Attic Fence piece and painted it with Tim Holtz Crackle Paint. I then took some of the  Moxie pp from the kit, cut out some of the little tombstones, stickled some blood onto some of them, used some of the Kaisercraft rub ons from the Romance Kit and applied those to some of the tombstones. I attached them with foam tape layered to give them different dimension and then popped on some of the Prima Printery Flowers from last months kit. I then wrote some cute Halloween sayings onto them in Sharpie.


I took a photo of Draven with the big scary monster who was out front of the Haunted cavern and framed it in one of the Acetate Frames that came with the kit. I also added a little Smooch to the frame just to add a little color.

I then created a fun Spook House style title by taking one of the Moxie Cut Outs from the Romance add on and layering it onto some pp, then adding some of the Kaisercraft Gems from the kit. I took some of the Pink Paislee Alphas from the kit, stickled the edges and adhered them with foam tape for dimension. To complete the Twist for this month, I took a large white feather and arched it over my title, and then took a tiny orange feather popped that on and then took the Prima Bat Vine from the Flora & Fauna add on, pulled off one of the bats and popped it onto my sign.

I loved watching my son and his friends get together and have a Frightful Fun time! Thanks for letting me share this fun memory with you! ~Renea


Tuesday, November 1, 2011

Design Team Reveal Berry Bleu Pages And Tags-Giving Thanks

Hi everybody and thanks for joining me for my very first project as a Design Team Member of Berry Bleu Pages And Tags. I am also excited to announce that I am being featured this month on the blog! You can check it out at  http://berry71bleu.blogspot.com/   I have a new tutorial video that goes along with my project and you can find it on the side board of my blog or view it at  thisYouTube link:  http://www.youtube.com/watch?v=PwODWqRLIWk&feature=feedu  I am also hosting the November challenge, and you can also join us for all the fun in the forums and in the galleries at http://www.berry71bleu.com/

November Challenge:  I took the word November and came up with the rules to play along by. Your project can be any type of project you dream up as long as it meets all of the rules listed. Marivic will be giving away a RAK


I will be giving away a small rack from my Etsy Shop.


The winner will receive, one set of Tiger Butterflies, one set of Sugar & Spice Butterflies, and one set of Elegance In Flight Butterflies. Good Luck!!!  **Just be sure to link your entry to the side bar on the Berry Bleu blog to qualify for both of the RAKS**

New -Do a project type that you have never done before or use a new technique
One -Use at least one fall flower
V
ariation -Use at least 2 different variations of the fall colors
Emboss-emboss an element on your project
Metal -Use a metal embellishment
Butterfly -Use at least one butterfly
Eleven -Use eleven of an element or embellishment (example: layers of pp)
Remember Have Fun!!!!

Here is my example for the November Challenge:


New - I had never made a hanging banner so this project type was new to me
One - As you can see I used some of my favorite fall flowers, sunflowers
V
ariation - I used the fall colors, pumpkin, gold, brown and terra cotta
Emboss - I used embossing powders and embossed my chipboard pieces
Metal - I used the Tim Holtz metal clips to attach the ribbon to my project
Butterfly - I used two of my hand made Sugar &Spice Butterflies
Eleven - I used eleven Prima E-pearls on my project
Remember Have Fun!!!! I definitely had fun!!


As always I am thankful for your friendship! I hope you can join us!!! ~Renea

Wednesday, October 26, 2011

Pink Paislee Phantom Of The Opera House

I am so loving getting to do Halloween this month. I had never scrapped any Halloween before, and it has been so much fun getting to step outside the boundaries and get quite wicked. With this next project, I even stepped off the page to create an altered project for the Pink Paislee October Contest featuring their stunning Phantom line of products. I used my Scraps Of Darkness October Kit-All Hallows' Eve to create this distorted sense of reality project, along with some stash pieces and a lot of imagination. My project is actually a play on the word Phantom and the Opera House, therefore the title "Phantom Of The Opera House". Here it is, my own Opera House complete with Phantom puppets, and a clash between wicked and beautiful!
I started with a card board box, took a template drew out the shape on the flaps then cut them to create the opera house wings and header. I then lined the floor, the inside back and sides with Pink Paislee and kit pps. I then gesso'ed the header, inked it with purple ink, crackled it, and reinked it with black ink to emphasize the cracks. I then took a wood flourish, left over from one of my house decorating projects, painted it orange and then grunge stamped it with some of the Invild Bolme ink from the kit. I popped my beautiful pin from Mandy (aka craftysprinkles) that is in the Romance Add On this month.

For the wings, I stripped of the outer layer of the box to reveal the corrugated board underneath, painted it with gesso and applied strips of cheesecloth randomly for texture, I punched lime green eyelets and then pulled wire through them and pigtailed the ends. I then took some Pink Paislee pp and fussy cut out the lime damask pattern and ran it down the sides. I took some of the Pink Paislee acetate frames from the kit, and laid them at an angle over pieces of the Pink Paislee Banner Kit from the Romance Add On,  that I distressed and inked the edges on and attached those. I painted the chipboard trees from the kit with purple glam and then stickled the branch tips with spiced marmalade.

I then took orange tulle pieces and layered and draped them for curtains, then popped on the 2 Pink Paislee flowers from the banner kit for draw backs. I took an old broken picture frame and cut out some of the Pink Paislee packaging, added some Kaiser Bling from the kit, popped it in the frame and hung it in the backdrop of the stage. I then took some plastic skeletons, misted one with the Shimmerz mist from the color add on and then misted the other orange. I painted popsicle sticks and wood beads and created my puppet handles, punched holes and tied wire from the handles to the skeleton's arms and legs, and there you have my creepy Phantom puppets.


I took one side of the box, gesso'ed it, inked it with orange alcohol ink, and then grunge stamped it with purple alcohol ink . I took a Pink Paislee Acetate Frame from the kit, crackled it and then inked it with the black Ingvild Bolme ink. I took a dress form from my etsy, added some bones and skull head and made my creepy character . I cut out some more Phantom packaging, added some bling and adhered it to the top of my side.

For the other side, I did the same technique with the ink and stamping and to another acetate frame as the first side. Cut the bird cage from some of the Pink Paislee pp and attached it with foam for dimension, and hung it from a Dusty Attic chain link piece that I had misted with the Shimmerz Mist form the CAO. I then took an acetate clock, backed it with some PP packaging and added it. The cats are some chipboard pieces that I glammed and then painted swirl patterns onto with the pumpkin smooch from last month's CAO. I added green gems to their eyes for that eery look. I cut out the happy haunting pieces from some more PP packaging as well as the top header that I added bling to.

For the final touch I added on some Tim Holtz metal feet and that is the conclusion of my Phantom Of The Opera House! Thanks for joining me and having a little fun coloring outside the lines and off the page! ~Renea

Monday, October 24, 2011

Scraps Of Darkness Round Robin-GO!!

Hi everyone! It is time for the Round Robin to kick off over at Scraps Of Darkness, and I am scheduled to go first for Team 2. Here is my team schedule:
Week 1  Renea
Week 2 LisaN
Week 3 Newtoscrapping - Courtney
Week 4 mmlsweet - Monica

And here is my kick off layout, featuring  a photo of my son Draven back in the Fall of 2005, and the super gorgeous Scraps Of Darkness October Kit- All Hallows' Eve. This kit is so versatile and you can scrap more that just Halloween with it. This layout shows how you can get that beautiful fall look with all those gorgeous pps. I did use some pieces from past kits as well. I love that Mel gives us product that we will reach for time and time again!!

I started with a piece of card stock from the August card stock add on then used a piece of stash pp that I distressed and stained the edges of using some of the stain from the June Color Add On. I then did some machine sewing and then took a grunge stamp and inked it up with the Ingvild  Bolme ink included in the kit. The teal pp is one from the new Paper Add On that kicked off this month and then the pumpkin pp is from the kit. I distressed and inked both of these layers with the same stain as the first. The strip layers beneath the photo are cardstock from a previous month's add on that I punched, and added some of the rub ons from the romance Kit onto and then some Tim Holtz ball chain from my stash.


I then took two of the Acetate Clocks from the kit and backed them with some kit pp and added them in behind my layers with foam tape for dimension.


I created the diamonds by cutting them out of pp from the September kit, distressing and inking the edges, then attaching Tim Holtz ball chain around the edges. I then took 2 of the brads from Septembers kit, attached them and then wound twine around them for texture and visual interest.


I created a flower layer using some cut outs from the July kit, Petaloo flowers from this month's kit,  a Prima flower and some Prima leaves from this month's Flora & Fauna Add On. I popped in a chippie that was in last month's kit that I gussied up using, the Shimmerz from this month's color add on, the black ink from this month's kit and the Smooch from last month's color add on. I then attached 2 brads from last month's kit that I colored with Tattered Angels Glam, and wound some more twine around them.

At the bottom corner of the photo I tucked in some more of those Prima leaves and then attached an Autumn sticker from my stash. To add the finishing touches, I took 2 of the Acetate crows from the kit and popped one on my Autumn branch, and then one on a tree branch in the photo.

Thank you for the visit! I can't wait to see what the rest of my team creates using my inspiration. It is so fun watching the layouts evolve from one to the next. Hope you find a fun challenge to play along with this month! ~Renea


Monday, October 17, 2011

Blog Hop Winners Announced!!!

~Scraps Of Darkness Blog Hop Winners Announced~

I just want to thank everyone who played along with us and helped make our first ever Halloween Blog Hop a success!!  The winners are posted up at the Scraps of Darkness blog so make sure you check there to see if you won a grand prize!! Plus check back at each of the DT's blogs to see if you won there as well!!

O.K. now for the winner of my prize-a $20.00 Gift Certificate to use in the Scraps Of Darkness store!!!
I did mine the old fashion way, by writing the entrees onto a piece of paper, wading them up and throwing them into a bowl. I then let my son, Draven choose the winner, and the winner is......

and this is kind of creepy and surreal, because their names are so close to one another!!!


Raeven!!! 
Raeven commented "Oh my, the talent I am seeing during this blog hop is amazing. I'm going to check out your stalker challenge. Just the same has me intrigued. I LOVED your chandelier. Its unique and gorgeous.

I've subscribed to your blog and will be back after some more hopping to read some more of your posts."

Thanks Raeven for participating in the blog hop, and for following me!!!

Friday, October 14, 2011

Welcome To The Scraps of Darkness Halloween Blog Hop!

Hi Everybody and welcome to my blog!! If you have been playing along with the blog hop you have found me by way of  Karen's (a.k.a. lostcoastscrapper) Blog If not you are welcome to jump in and start at the beginning by going to the Scraps Of Darkness Blog!!

How to play:
  Our design team will be revealing their projects for the Scraps Of Darkness October Kit-All Hallow's Eve. You will need to visit each blog and leave a comment that you have been there. Your last stop will be Lisa's (a.k.a. Raining) Blog.

Melinda will be giving away 2 of those uber gorgeous kits-squeeel!!! Here is a pic of the dark beauty:


To qualify for the two Scraps Of Darkness October Kits that are being given away,  you will need to leave a comment on the Scraps Of Darkness Blog, and all of the Design Team's Blogs, letting us know you have visited all the designers. A winner will be randomly selected. You have from  Saturday, October 15- Sunday October 16th  (12:00 a.m. pacific standard time) to complete the hop. A winner will be announced on Monday October 17th!!!

Along the way, the design team members will be offering up their own raks and prizes!!!! So you can win more than one prize!! Just don't forget to leave a comment at each stop you make!
In case you get lost along the way here is a complete list of  order:

I Am Your Sixth Stop!
The following are my reveal projects that I created using the Scraps Of Darkness October Kit-. I wanted to show off the amazing versatility of these blow me away gorgeous kits that Melinda puts together for us. The kits along with coordinating add ons offered each month will have you scrapping beautifully right out of the box. The kits are packed with so many goodies and items that you will find yourself reaching for again and again, and you will also find that you spend less time shopping and more time scrapping, almost everything you need is delivered to your door.

Each kit comes with a sketch from our super talented sketch artist, Charlotte (aka Suepup). These sketches will inspire you and keep that mojo flowing. Here is this month's sketch:

And here is my interpretation:

This layout shows the romantic side to the kit with a photo of one of my favorite dark couples of all time, Mina and Dracula, from Bram Stoker's version of the movie "Dracula".
I created this resin look chandelier, using chipboard, gel medium and the gorgeous Shimmerz Enamels from the this month's color add on.

To create the flower layer, I used the Petaloo Chantilly flowers from the Flora & Fauna add on, mixed with some tulle flowers I created and hand painted florals and swirls I cut out with my Sizzix. The clock face is the Kaiser Acetate frames from the kit.


The frame around the photo is one of the Moxie Die Cuts from the Romance Add On, the bling on the edges of the frame and the vine winding it's way through the layout was included in the kit.


Next, I wanted to show the more girlie grunge side:

This layout is the example for the Stalker Challenge that I host each month over at Scraps Of Darkness, and I would love to have you come and play along! I used the Dusty Attic Sketch from this Month for inspiration.


I used the pps from the kit,  and punched circles, then did machine sewing to accent the edges. The large circle features my wicked black & white photo, framed out with card stock from last monthes kit,  Petaloo and Prima flowers from the Romance add on, and one of the painted and tattooed Dusty Attic spiders that I purchased from the Scraps Of Darkness store.


I did a lot of technique work on the layout. The background is strips of white card stock and cheesecloth. I then took the brick mask from last month's kit and painted it on with gel medium and the black Ingvild Bolme ink included in the kit.  The spider web is one that I hand drew onto the layout with glue, layed yarn down into the pattern and then stickled to get the glitter and depth effect.


I love how the large spider turned out that I hand tattooed and then blinged up. don't you just love how she is dropping down the brick wall? My journaling is a Sir Walter Scott quote-"Oh What A Tangled Web We Weave When First We Practice To Deceive", and ties right in to my title work Deception.


The next layout is for the Halloween Movie Contest that Mel's husband, Brian is putting up a prize for! The winner will receive a $50.00 credit to the Scraps Of Darkness Store!!! Mine of course is just for fun, but I invite you to join us for a chance at that more than awesome prize!
I did my layout based on the movie "Nightmare On Elm Street", and it definitely shows the very dark side to the kit. That movie scared the bejeezies out of me! I am trying to get up the nerve to watch it again with my teenage son, Draven, but that Freddy Kruegar totally mortifies me.

I used lots of distressed pp layers from the kit to create this layout.


I want to mention that we did a critter swap, hosted by Sarah (aka Chaton13) and I got the wicked gold flies that you see on the layout from Nancy (aka Nancola). We called them sticky bugs, because when they arrived the gold leaf had not yet dried, but I left them out in the air and they did finally dry. So, thank you Nancy! I didn't have to give them a glitter bath after all-lol!! The strips behind Freddie's photo are pieces of dry wall repair -lol. I did some masking in the background with a chicken wire template and the Shimmerz mist from the kit.

I fussy cut the house from the pp, colored the windows with markers for emphasis, and adhered it with foam dots for dimension. I popped on a tiny, creepy Freddy shadow in the eve.

The door door frame came in the Romance add on and I sprayed it with the Shimmerz Mist from the CAO and then Rock Candied it for texture. The barbed wire and key are Dusty Attic pieces that I gussied up.


And last, but not least, is a layout that features my son Draven when he was 18 months old, dressed as a Dragon for Halloween. This layout shows the fun, cute side of the kit:

This layout is made up of lots of pp layers from the kit. the orange layer has stenciling done with gel medium for texture and depth.


The flowers with the crystal centers are from the Flora & Fauna add on and the one small orange flower is from July's kit. The swirl pieces are chipboard that I cut apart and painted using the Shimmerz paint from the CAO and purple ink.

I created a vile of Dragon Tears using a Tim Holtz bottle, glitter, and then made a label and tied a piece of raffia around it. The frame under the photo is one of the Moxxie die cuts from the Romance add on that I stickled and blinged with the Kaiser gems from the kit.


The letters are the Pink Paislee chipboard letters from the kit. I inked the edges for  contrast.


Thanks for letting me share all of my reveal layouts with you, and now for the........

PRIZE!!!
I am giving away a $20.00 Gift Certificate to the Scraps Of Darkness store!!!! Mel keeps our store stocked with the latest chipboard, embellishments and technique driven  supplies, and here is your chance to win a little extra spending cash for some of that scrappy goodness! To enter, you must be a follower of my blog, and then make sure to leave me a comment to this post. When the blog hop ends Sunday night, all entries will be put into a bowl and a name will be drawn and announced here on my blog Monday morning. Be sure to check back Monday to see if you won, and then contact me with the e-mail address that you want the gift certificate delivered to electronically. It's that simple!!!

Thanks for hopping by! Your next stop is my little dark sister Cheryl's (aka C Mom Go) Blog!! Have fun, but a quick warning, she said she was scrapping really dark and spooky!!!!!  ~Renea

Wednesday, October 12, 2011

Last Week Of The Scraps Of Darkness Feature At The Robin's Nest

The Design Team over at Scraps Of Darkness is all a chatter, because it is week two of us being featured over at the Robin's Nest's Blog- "The Chattering Robins"! The Scraps Of Darkness August Kit-Envy featured items from the Robin's Nest line, and the DT caught there attention with so many gorgeous layouts that they decided to do a feature on us. They are doing a 4 week feature on Wednesdays, and this is the last week of that feature.  We are so proud of Melinda and all the hard work that she puts in to designing these kits for us, so this is a well deserved honor for her and the super talented Design Team. We hope that you will join us over there, and help us to celebrate yet another big accomplishment for such an amazing Kit Club! The artists being featured this week are Karen, Charlotte and Me! ~Renea