Thursday, August 4, 2011

I Am Now A Twisted Sister!!

Hi everybody! Just wanted to let all of you know that I am now a member of the Twisted Sketches design team. I love using sketches for some of my layouts and Twisted Sketches always has some of the most inspiring sketches with the most fun and creative twists. I figured that since sketches are something I already incorporate into my work, why not have a little fun, get inspired and hang out with old friends, as well as make some new ones through this assignment. I hope that you will join me and get your sketch on!

This is the Twisted Sketches Sketch #113 that was used for the Design Team Call-with the Twist being Vintage:


The following is the layout that I created using that sketch. It features that sweet Princess Emmie playing in her castle and is titled: Every Princess Needs A Castle


Thanks for all your inspiration! ~Renea


Monday, August 1, 2011

Scraps Of Darkness July Round Robin

The following layout is one that I did for the July Round Robin being hosted by Lisa (Raining) over at Scraps Of Darkness.com. I had never done a Round Robin before, and decided it was high time that I got on board with it, and I am so glad I did. Ladies if you have never done one before, I urge you to try one. It was so much fun! First, was the anticipation of watching the first week's team member reveal their layout and then came the second week's reveal and now it's my turn! On my team the first weeks layout was done by Jennifer (Jrabs), and Monica (mmlsweet) followed her, and I then it was my turn to take what they have done and make it my own. I can't wait to see what QT does when she lifts me. Next to getting something scrappy in the mail, this has to be the second most exciting thing to take part of.

Jennifer's  (Jrabs) Layout
1st Week


Monica's  (mmlsweet) Layout


And here is mine!


I started with a piece of stash Tim Holtz pp, distressed and inked the edges, and punched with a Martha Stewart punch just to add some interest and tie in the butterfly in the photo. I then took a piece of corrugated packing that I wanted to recycle and painted it with a gesso and acrylic paint mix.


I then took some of the gel medium I love so much and gunked it on heavy in places, let it dry then stamped it with a damask stamp to match the BG pp.


I took some of the kit pp, cut it to size, inked and distressed the edges and set some eyelets into it. I used a Petaloo Color Me Crazy rectangle shape and then layered the photo over it. The photo came from one of my DH's musician friends in Russia's profile. I loved the goth look of the photo, tied in with the feminine flowers and butterflies. I inked and distressed the edges on the photo just to add some visual interest. I then took some of the cardstock from this month's add on, punched it with the Martha Stewart Butterfly punch and pearlized some accents then adhered it for a bottom trim. 
I then took some burlap and gesso-ed it up, layered it with one of the die cuts from the kit and a stash flower with some of the flowers that I cut off the Romance Add On vine for an earlier layout.


I cut some flourishes out from the same card stock, using my Sizzix, and painted it with some of the Perfect Pearls I used on the butterfly border. I loved the square tiles that Jen used in her layout, but I didn't have any, so I created some using the pop outs from some of the window chipboard that my SB.com friend Cindy Gay had sent me, and painted them with metallic acrylic paint.

That's my take on the first 2 layouts and my submission for the Round Robin! Check out QT's gallery next Monday and see what she does with it-until then I will be lurking in her gallery-lol! ~Renea

Saturday, July 23, 2011

A Sister Is A Forever Friend


This layout was made using my Scraps Of Darkness July Kit-Marrakesh Express, and features some photos that my son-Draven took at my Niece, Megan's wedding. They are of her and her little sister, Hailey. Since I don't have any girls, they have been the princesses in my life, and it was so sweet to see Megan head off to her happily ever after. I started with one of the kit pps, and then punched some stash cardstock to look like lace backing. I then took another piece of cardstock from my stash, inked and distressed the edges and then stamped it for added interest. Next came a piece of this month's cardstock add on that I inked and distressed the edges of. I then took a Prima stencil and created a background trellis using gel medium and acrylic paint. I then punched a strip for the side using a kit pp and Martha Stewart punch, then took another strip of kit pp scallop cut it and used it for the bottom border.


 I took white cardstock from my stash and made photo mats by embossing and inking them, then placed the photos on top. I took a piece of the kit chipboard and painted it with gesso then used colored gel medium to add the accents, and applied heat to give the gel medium depth. I then took the metal pieces from the kit added some stash pearls and used them to "hang" the 2nd photo. This was actually inspired by Natasha's (Luv.my.babiez),  "You Are My Strength" layout. I loved the way she used the photo hangers and duplicated that look here. Thanks for your inspiration, Natasha!  I then took a piece of Dusty Attic Wrought Iron Trim and used the same paint technique on it as the frame and added some stash pearls and attached it as a border.


I then hand made some flowers and took the Prima vine from the Romance add on, cut off the flowers and added mine. I tucked in some beautiful white feathers that were a gift to me from my friend ChattyCathy at SB.com, and attatched the piece to the trellis I created with gel medium. I then took the Prima butterfly from the Romance add on and used gesso to paint and tone down the color to match the layout and attatched it to the top corner of the photo. I then used some stickers to place the word Sister and journaled with "A Sister Is A Forever Friend."

I love the way this turned out so Fairy Tale pretty, befitting two beautiful princesses ! Thanks for letting me share them with you! ~Renea

Thursday, July 21, 2011

A Child's Laughter Is The Spice Of Life-The Darkest Side Challenge

I love a good challenge, and Celina, our Mistress of Mayhem over at Scraps Of Darkness always comes up with something fun and creative to get us thinking outside the box. This month’s challenge topic is The Spice of Life. We could interpret this any way that we liked. We could use anything related to spices or what makes your life "spicy." The following is my layout for that challenge.


I love these pics of my son and some of his friends playing dress up, laughing and have a ball!! I have always said that there is nothing more beautiful than the sound of children's laughter, so I titled my layout "A Child's Laughter Is The Spice Of Life." I wanted to make my layout look like Spanish Tiles look with all those beautiful bright colors and patterns.  I used cardstock as my base layer and then layered on another piece of card stock from this month's add on for the second layer. I then cut paper strips from the colorful kit pps and a circle from another piece of add on cardstock. This got my placement for the pics down so that I could start adding the layers of color.


I used gel medium and some of the Twinkling H2Os  from the color add on to paint the border around the cardstock. I then used a stencil and created the big bright butterfly with gel medium and all the different colors in the H2O kit. I made the butterfly's body from a piece of the trim that was in the kit.
I took some bling from my stash and painted it up colorfully using Tattered Angels Glam and used it for a border. I took some chipboard frames that my friend Cindy Gay had sent me and painted them and then Stickled them for emphasis and placed them over the kids in the photos.


I used some of the beautiful coin trim in the kit and trimmed the bottom of the smaller photo with it.  I took some of the Marrakesh Die Cuts from the kit and stacked and layered them placing them around the layout for "flowers". I made a water-colored tag using the H2Os and stamped it with The Spice Of Life, adding a brad and one of the coin pieces from the kit trim.


I created the first part of the title using some stash Tim Holtz framents and some stickers that I outlined with black marker. For the finishing touch, I took some of the bling that I painted and placed it around the border.

I hope you have something in your life that adds a "little spice" to it! Thanks for coming by, and checking out mine!  ~Renea


Friday, July 15, 2011

SCRAPS OF DARKNESS AUGUST KIT-ENVY

It's the 15th, and you know what time it is, reveal time at Scraps Of Darkness. This month's kit is packed with girlie-girl deliciousness!  The kit is called "Envy", but us girl's over at Scraps Of Darkness have been calling it the Jewelry Box, because it is packed full of some of the most gorgeous gems out there. I love that Mel puts together kits that are so versatile and never take on the same old same old look. I am always amazed at all the different types of layouts that can come out of one kit!


This kit is so lovely and the add ons are equally as beautiful. The kit features papers from the Robin's Nest and Kaisercraft in romantic pinks, greens and blues. There are also some rich browns, and yellows.  The colors are all soft, beautiful and so perfect for  a vintage or shabby chic look, and the way the papers work together with the embellishments and add ons make scrapping, one gorgeous page after another a breeze.

The Main Kit; includes 10 sheets of premium patterned paper, as well as embellishments that will coordinate with those papers, along with new sketch each month, specially designed by Suepup for that kit. 

So get your girlie-girl side on and join us before these kits are sold out ( I promise you it won't take long). ~Renea

Marrakesh

One of the things I love about the Scraps Of Darkness Kits, is that I  get to work with one of Charlotte's (aka Suepup) sketches each month. Every month she come up with a fabulous design based on the kit, and instant inspiration gets delivered right to your door.  The following is the Sketch that she designed based on this month's kit-Marrakesh Express:


And here is my interpretation of that sketch, using this month's kit:


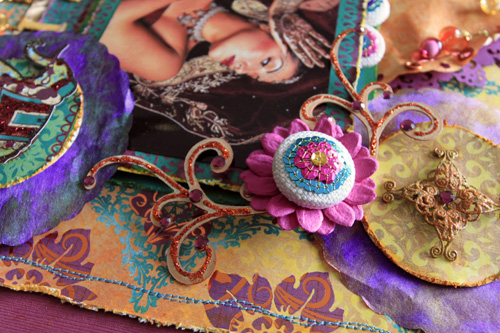
I started with a piece of the cardstock add on, and then made the second layer from one of the kit foil pps (these foil pps are so stunning in real life-photos just can not do them justice) that I inked and distressed the edges of, and did some machine sewing on. I used another piece of cardstock add on  and another piece of kit pp to make the double frame backing for the photo (courtesy of  Google images). I then applied those frames with layered foam tape to get enough dimension to tuck in the sequined Prima pieces.


I then created the photo corner flourish by cutting out some chipboard with my Sizzix, painting it, applying some stickles (from the June Kit) and adding some bling from my stash. I then took one of the Prima flowers from this month's kit and added one of those Prima accents (from the Romance Add On) onto the center. I then created another flower, using the exact same technique and added it to the bottom photo corner. I created the large circle using cardstock from this month's add on, and punching the edges to add a decorative touch. I then used the H2O watercolors from the color add on to paint one of the Fancy Pants Filter Paper decos (from May's kit) attatched it to the punched circle then laced copper wire through the holes, pulled apart one of the Prima Candy Gems( from the Romance add on) and attatched them randomly to the copper wire.


For the medium circle, I spritzed and watercolored one of the filters with the spritz and watercolors from this month's color add on, circle cut a piece of one of the pps, distressed, and inked the edges, and then took one of the metal jewel pieces from the kit that I embossed and added bling to, and popped it in the middle.


The smaller circle is one of the filter papers that I spritzed and watercolored using the color add on. I then cut a circle from one of the pps, distressed and inked the edges, and then took one of the elephants that came in the kit and stickled him up, adhering all the pieces with foam tape for dimension. I then created one of those Prima flowers with the Prima centers and popped it on the corner.


I then made a strip using one of the pps, distressed and inked the edges, and then attatched it to the beautiful coin trim that was in the Romance kit, and added it to the bottom of the layout. I used some of the chipboard alphas from May's kit, embossed them and then added the title.

Suepup's sketches are always so inspirational and I just loved working with this one to create this bright, vibrant layout! Thanks for looking! ~Renea


Baby Boy


This Scraps Of Darkness layout features a photo that is so precious to my heart. It is one that my DH took just a few days after our son, Draven, was born in June of 1995. It was actually taken with Kodachrome film before digital ever came along. I started with a piece of the kit pp for the background, then took a stash, Dusty Attic frame and painted it with Tattered Angels Glitter Glam. I then took a piece of the card stock add on, and using some TA masks, misted with the Coloringz mist that was in the color add on.

 
I then stamped one of the corners, wiping my stamp at random places to get the varied print.


I positioned the picture and added some stash photo corners. Then took one of the K & Company rub ons from the kit and and placed it over the masking and added the included bling.


I took the same card stock and stamped it with the same writing print that is in the corner, punched it out and added the black trim piece that came with the kit. I then cut out 2 of the canvas flowers from the Prima mistable canvas that came in the color add on, misted them with the Coloringz mist that came in the color add on,  embossed, inked and punched the flower shapes from white cardstock, punched the centers from black cardstock and rolled them to make the flower centers. I took a Spare Parts clock piece from my stash added a white brad and stamped the word boy onto it. I then took a stash metal piece with Baby on it and adhered it to the punched trim.


I cut the canvas butterfly from the Prima canvas sheet in the color add on, misted it with the Coloringz mist, and inked the edges. I then painted a Dusty Attic butterfly with white acrylic paint and stamped it with the same stamp as the corner and trim, and attatched it to the canvas piece. I then took some chipboard, I purchased from the Scraps Of Darkness store, painted it with black acrylic paint. and placed them around the butterfly.

I can't believe that sweet baby boy in the photo is now 16 and so grown up. Somedays, my heart aches for the time that has gone by so fast. Thanks for stopping by and taking a peek and for letting me reminisce for just a few! ~Renea